
Lesson 1: Studio Basics
Overview
This first lesson uses a toy assistant that looks at the last message from the customer and determines if it had a positive, negative or unclear sentiment.
It serves as a basic backdrop while you learn about the layout, navigation and general functionality of AI Studio.
The Studio Basics assistant is designed to identify the sentiment of the customer's input and route to different messages. Subsequent lessons will be based on a fictional bicycle retailer, QuiqSilver Bikes.
What You'll Learn
In this lesson we will cover:
- Basic navigation and layout of AI Studio
- How to Chat with your assistant and use the Debug Workbench
- How to view Behaviors in the Flow panel
- How to make a simple tweak to your assistant
- Review changes and publish
In this section you'll find a video walkthrough as well as a written playbook you can follow along with. You can view walkthroughs of all the available lessons here.
For help getting started and creating a template, refer to the intro guide .
Video Walkthrough
Creating the Template
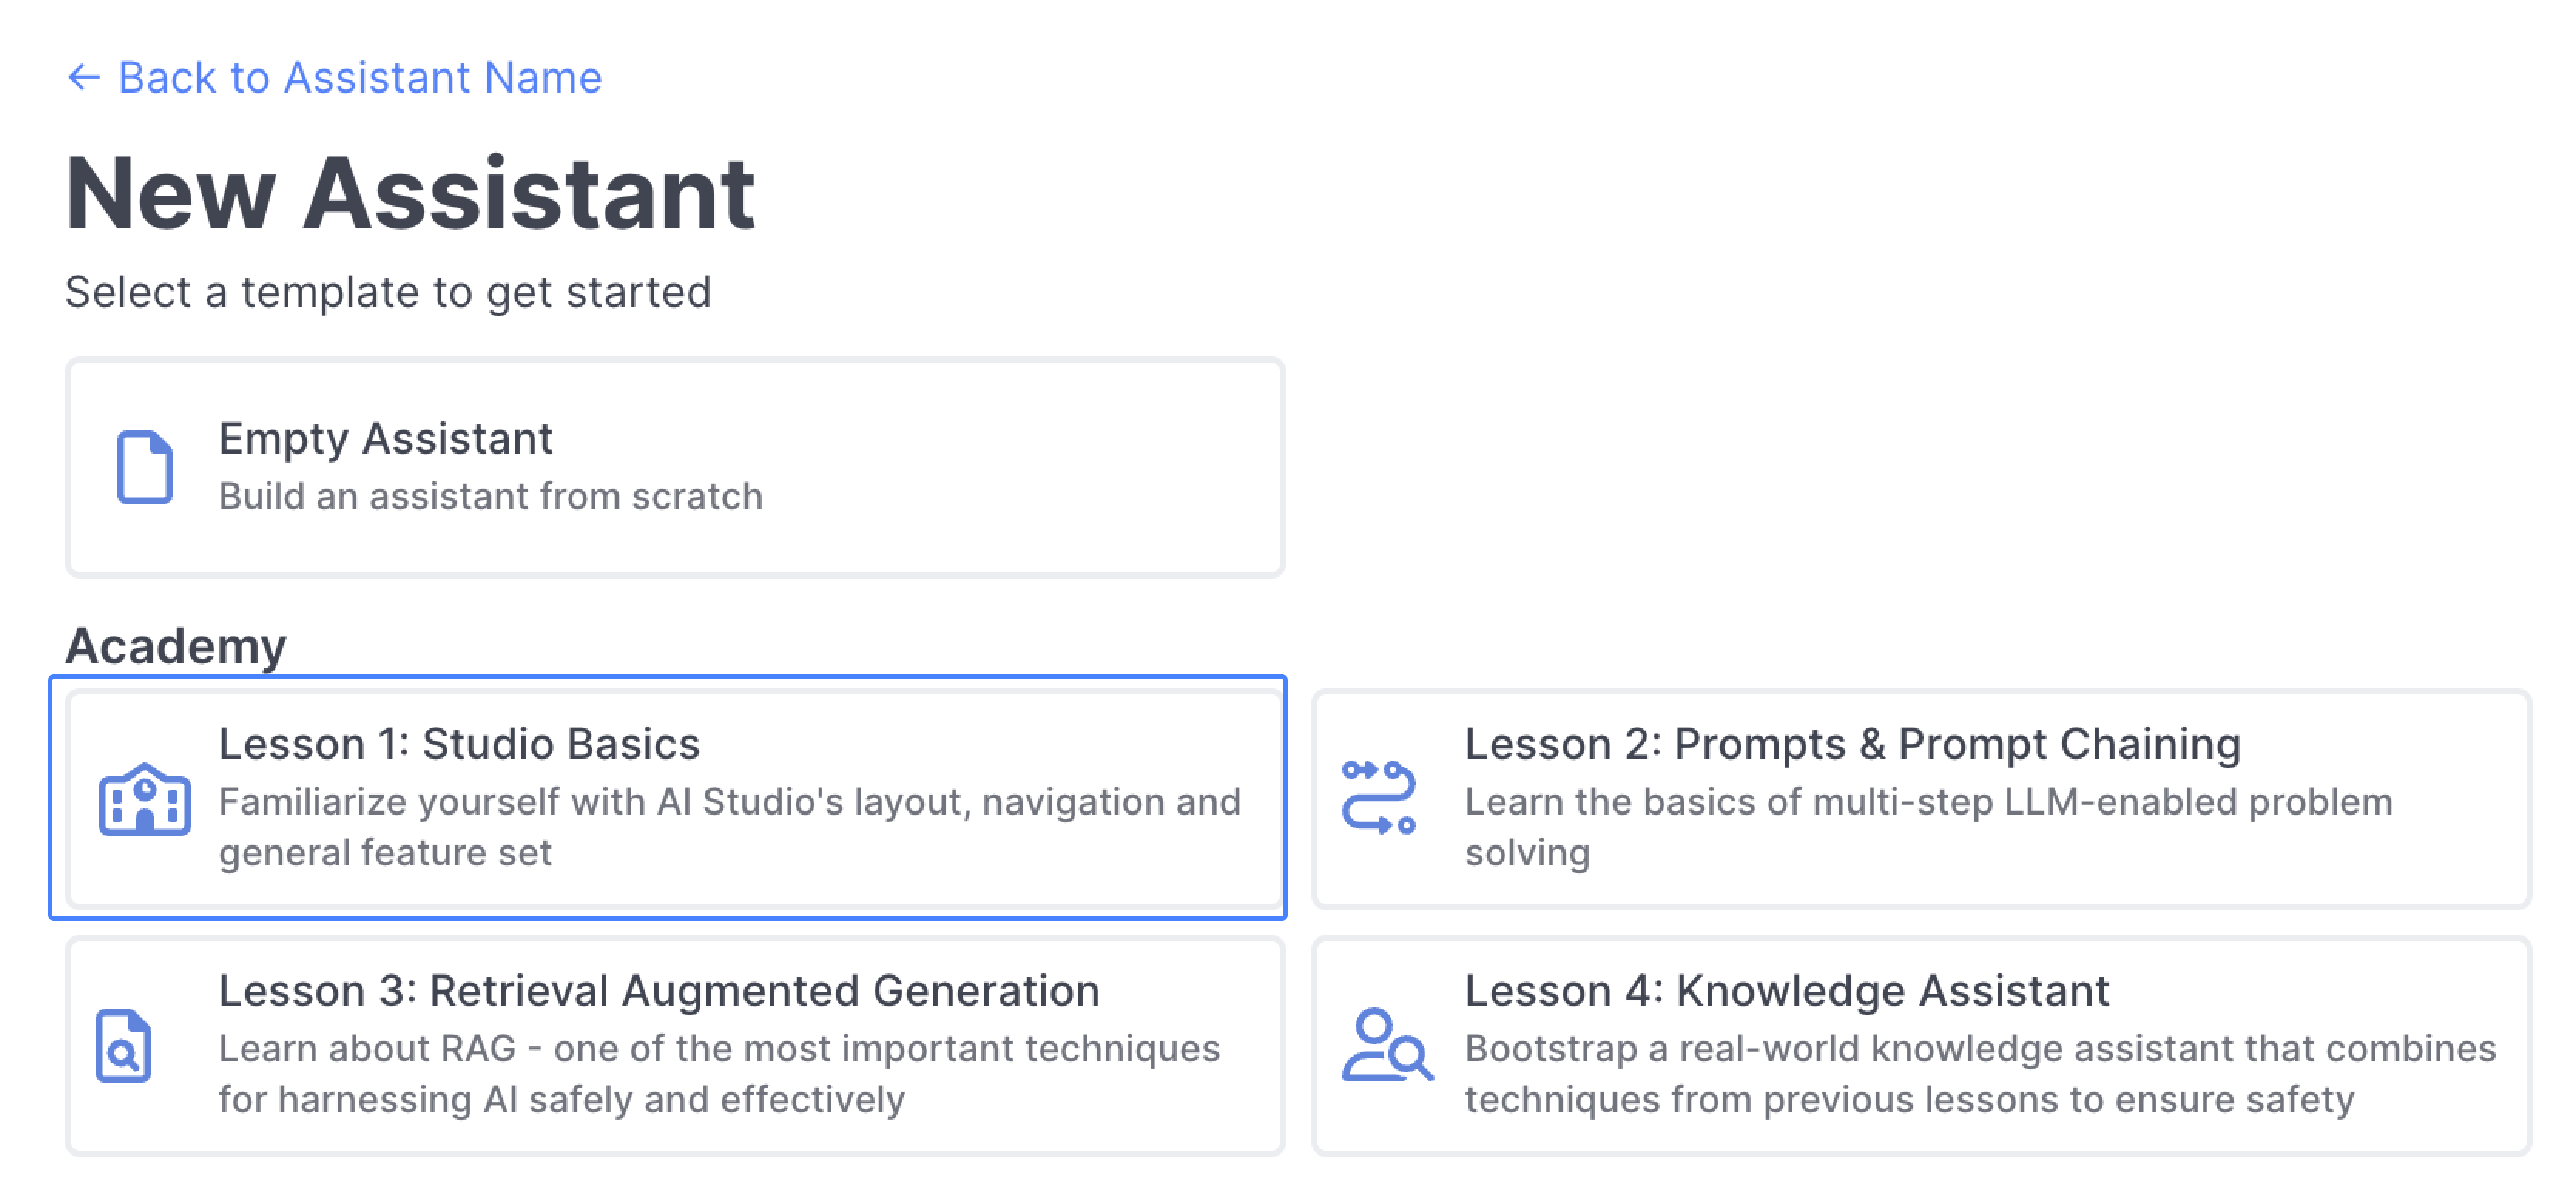
Select the Lesson 1: Studio Basics template to get started:
Basic Navigation
First, find the main navigation toolbar in AI Studio:
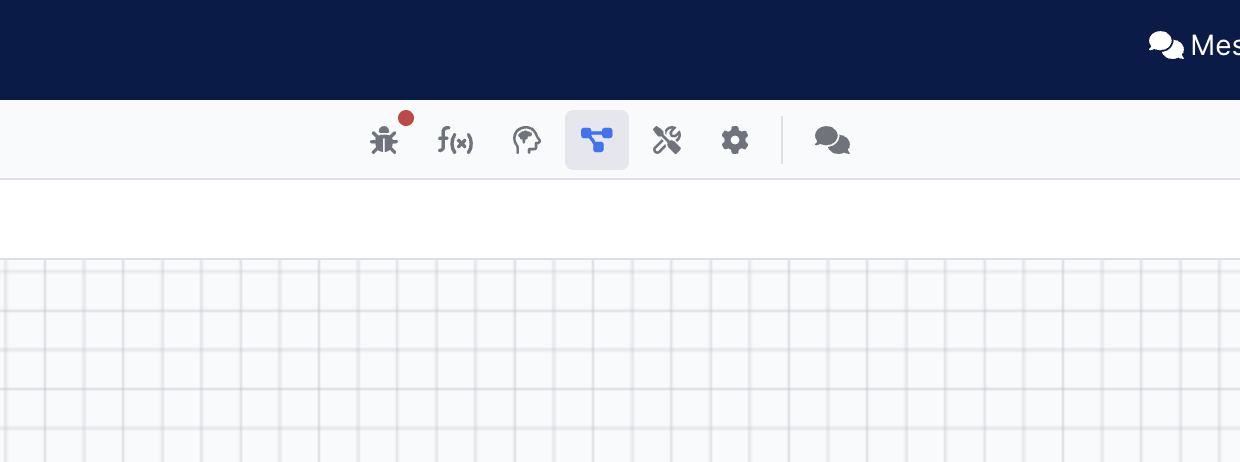
Hover over each icon in the toolbar: each of these icons correspond to a core section of AI Studio that you'll learn about during the course of the lessons.
You can determine whether panels open side by side, or one at a time, in the Configuration Panel.
Flow Panel
The Flow panel is the panel that will be open by default when you create a new assistant. The Flow panel consists of all the Behaviors that make up your assistant.
Behaviors can do all sorts of things, like send a message, leverage one or multiple LLM prompts, collect customer input, route to another assistant or agent, execute logic based on available information, and much more.
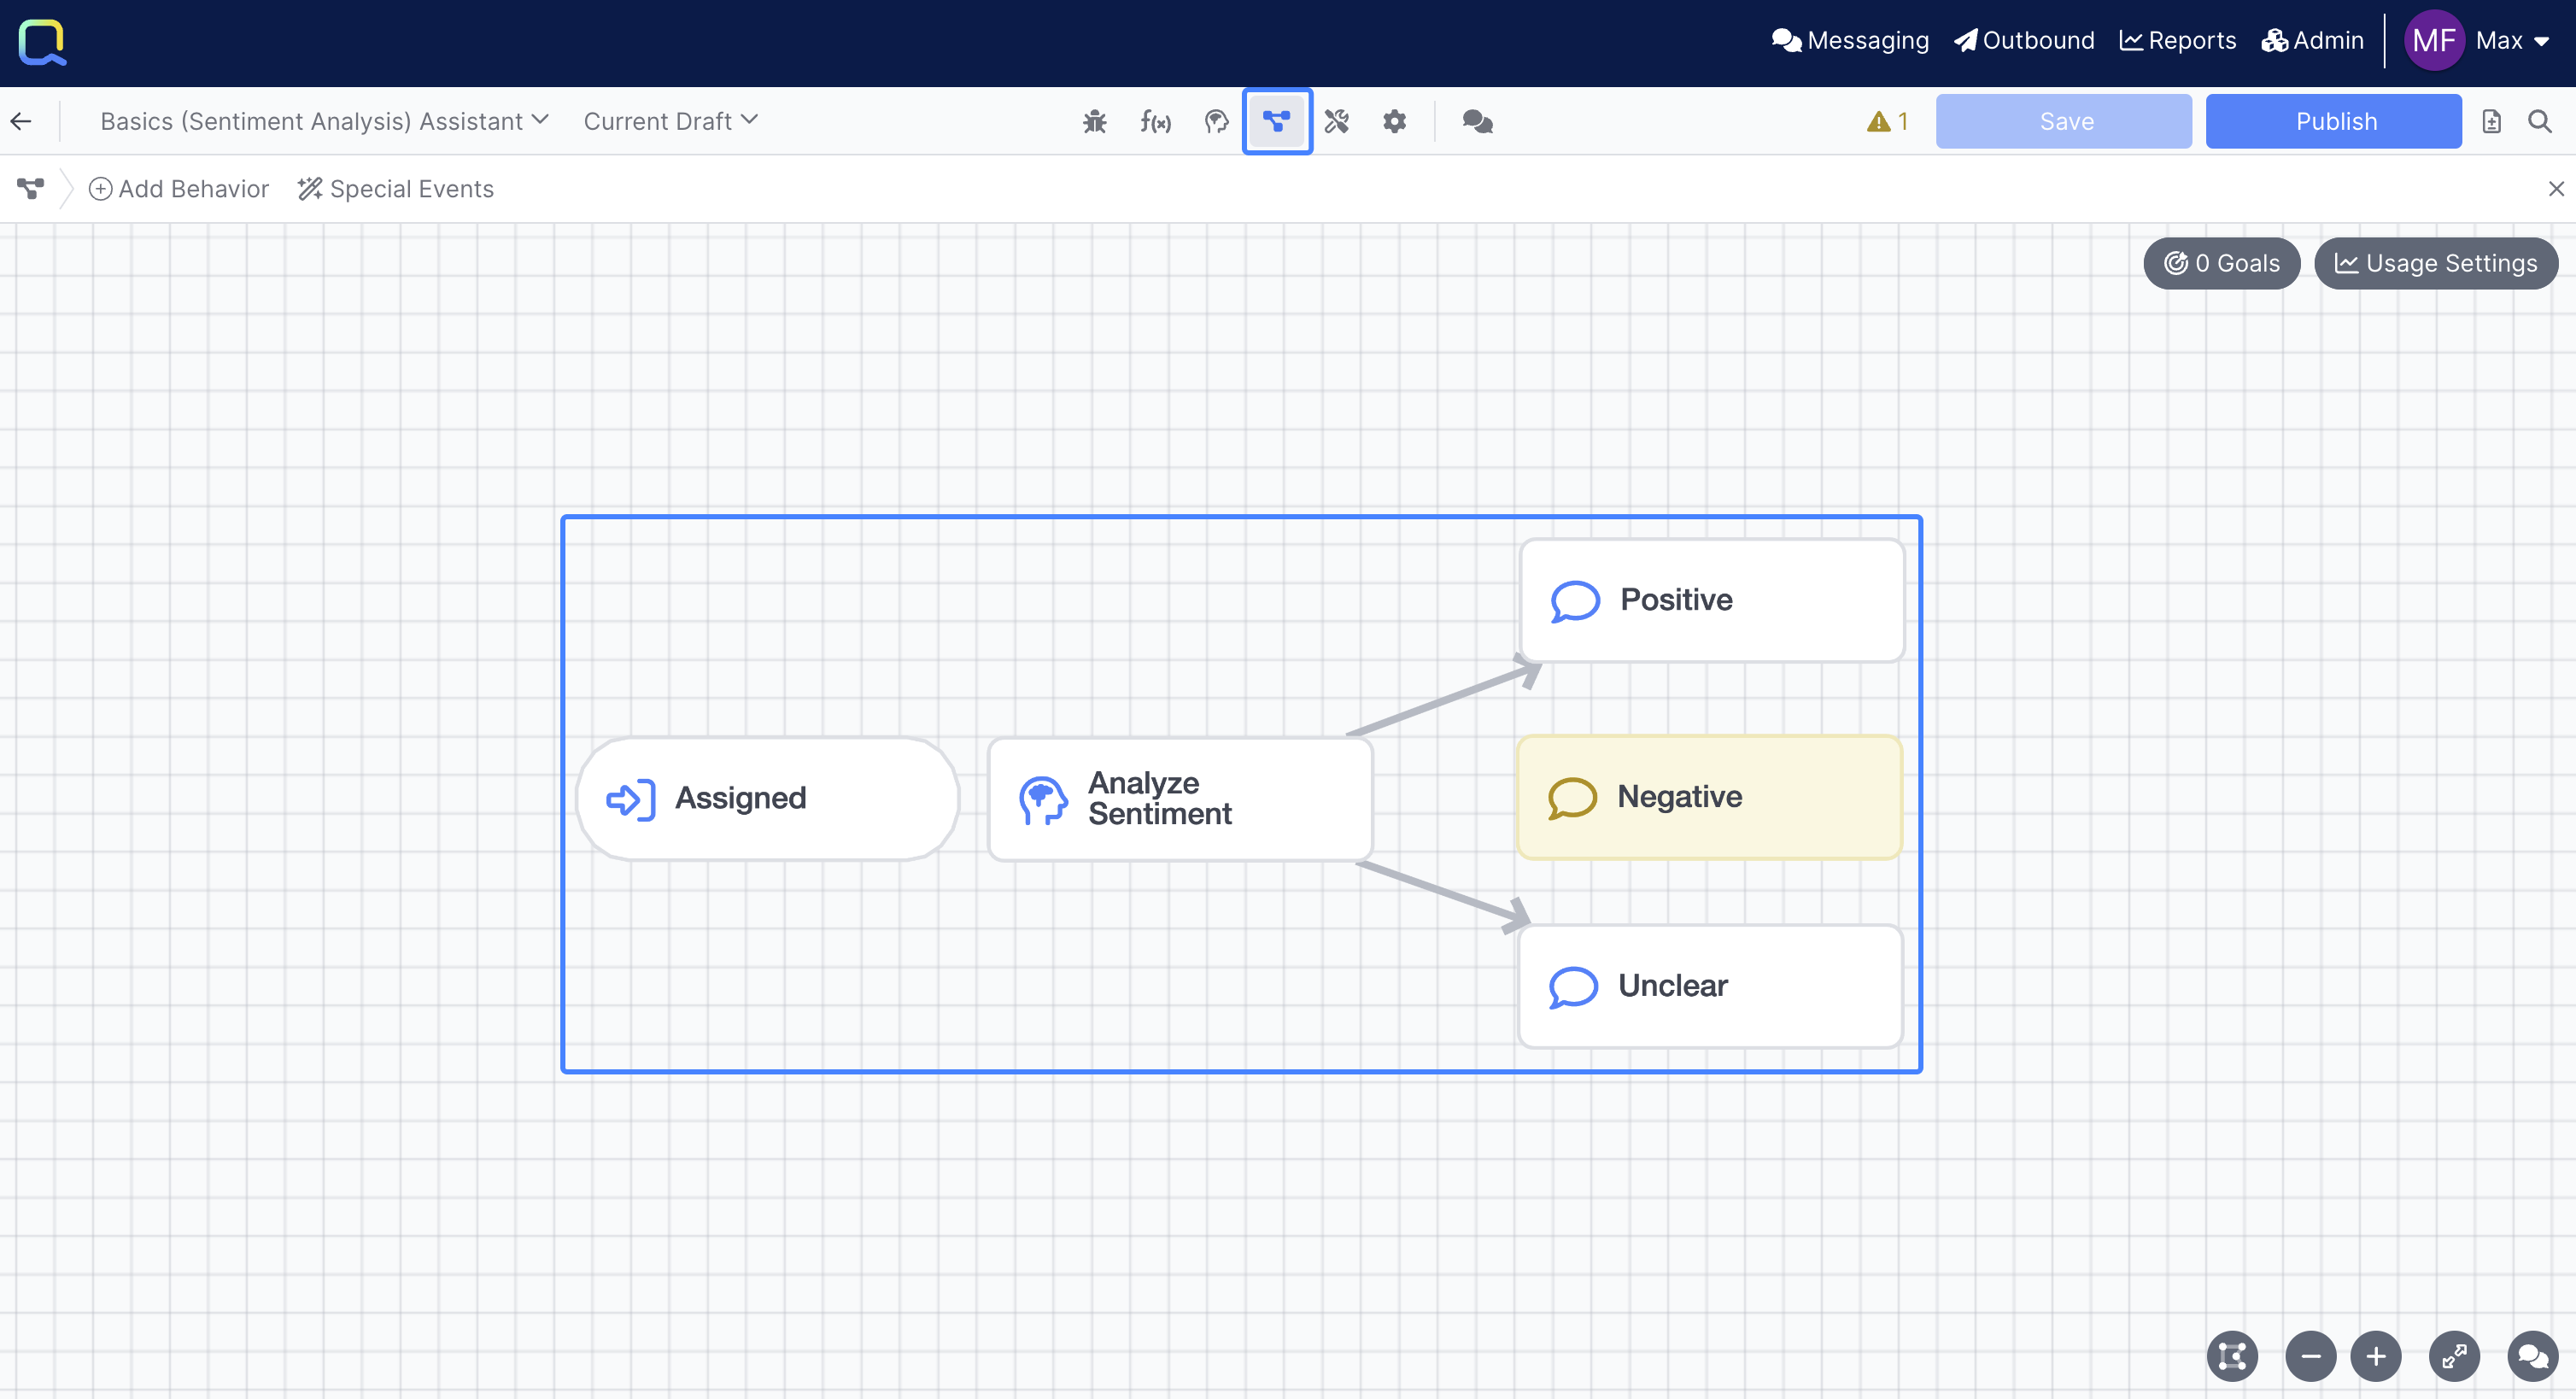
The Studio Basics assistant, which has 3 Send Message behaviors, a Prompt behavior, as well as an Assigned behavior.
Different types of behaviors can be distinguished at a glance by their icons; for example the Send Message behavior uses a message bubble icon, and the Prompt behavior uses the head with brain icon.
Chatting with your Assistant
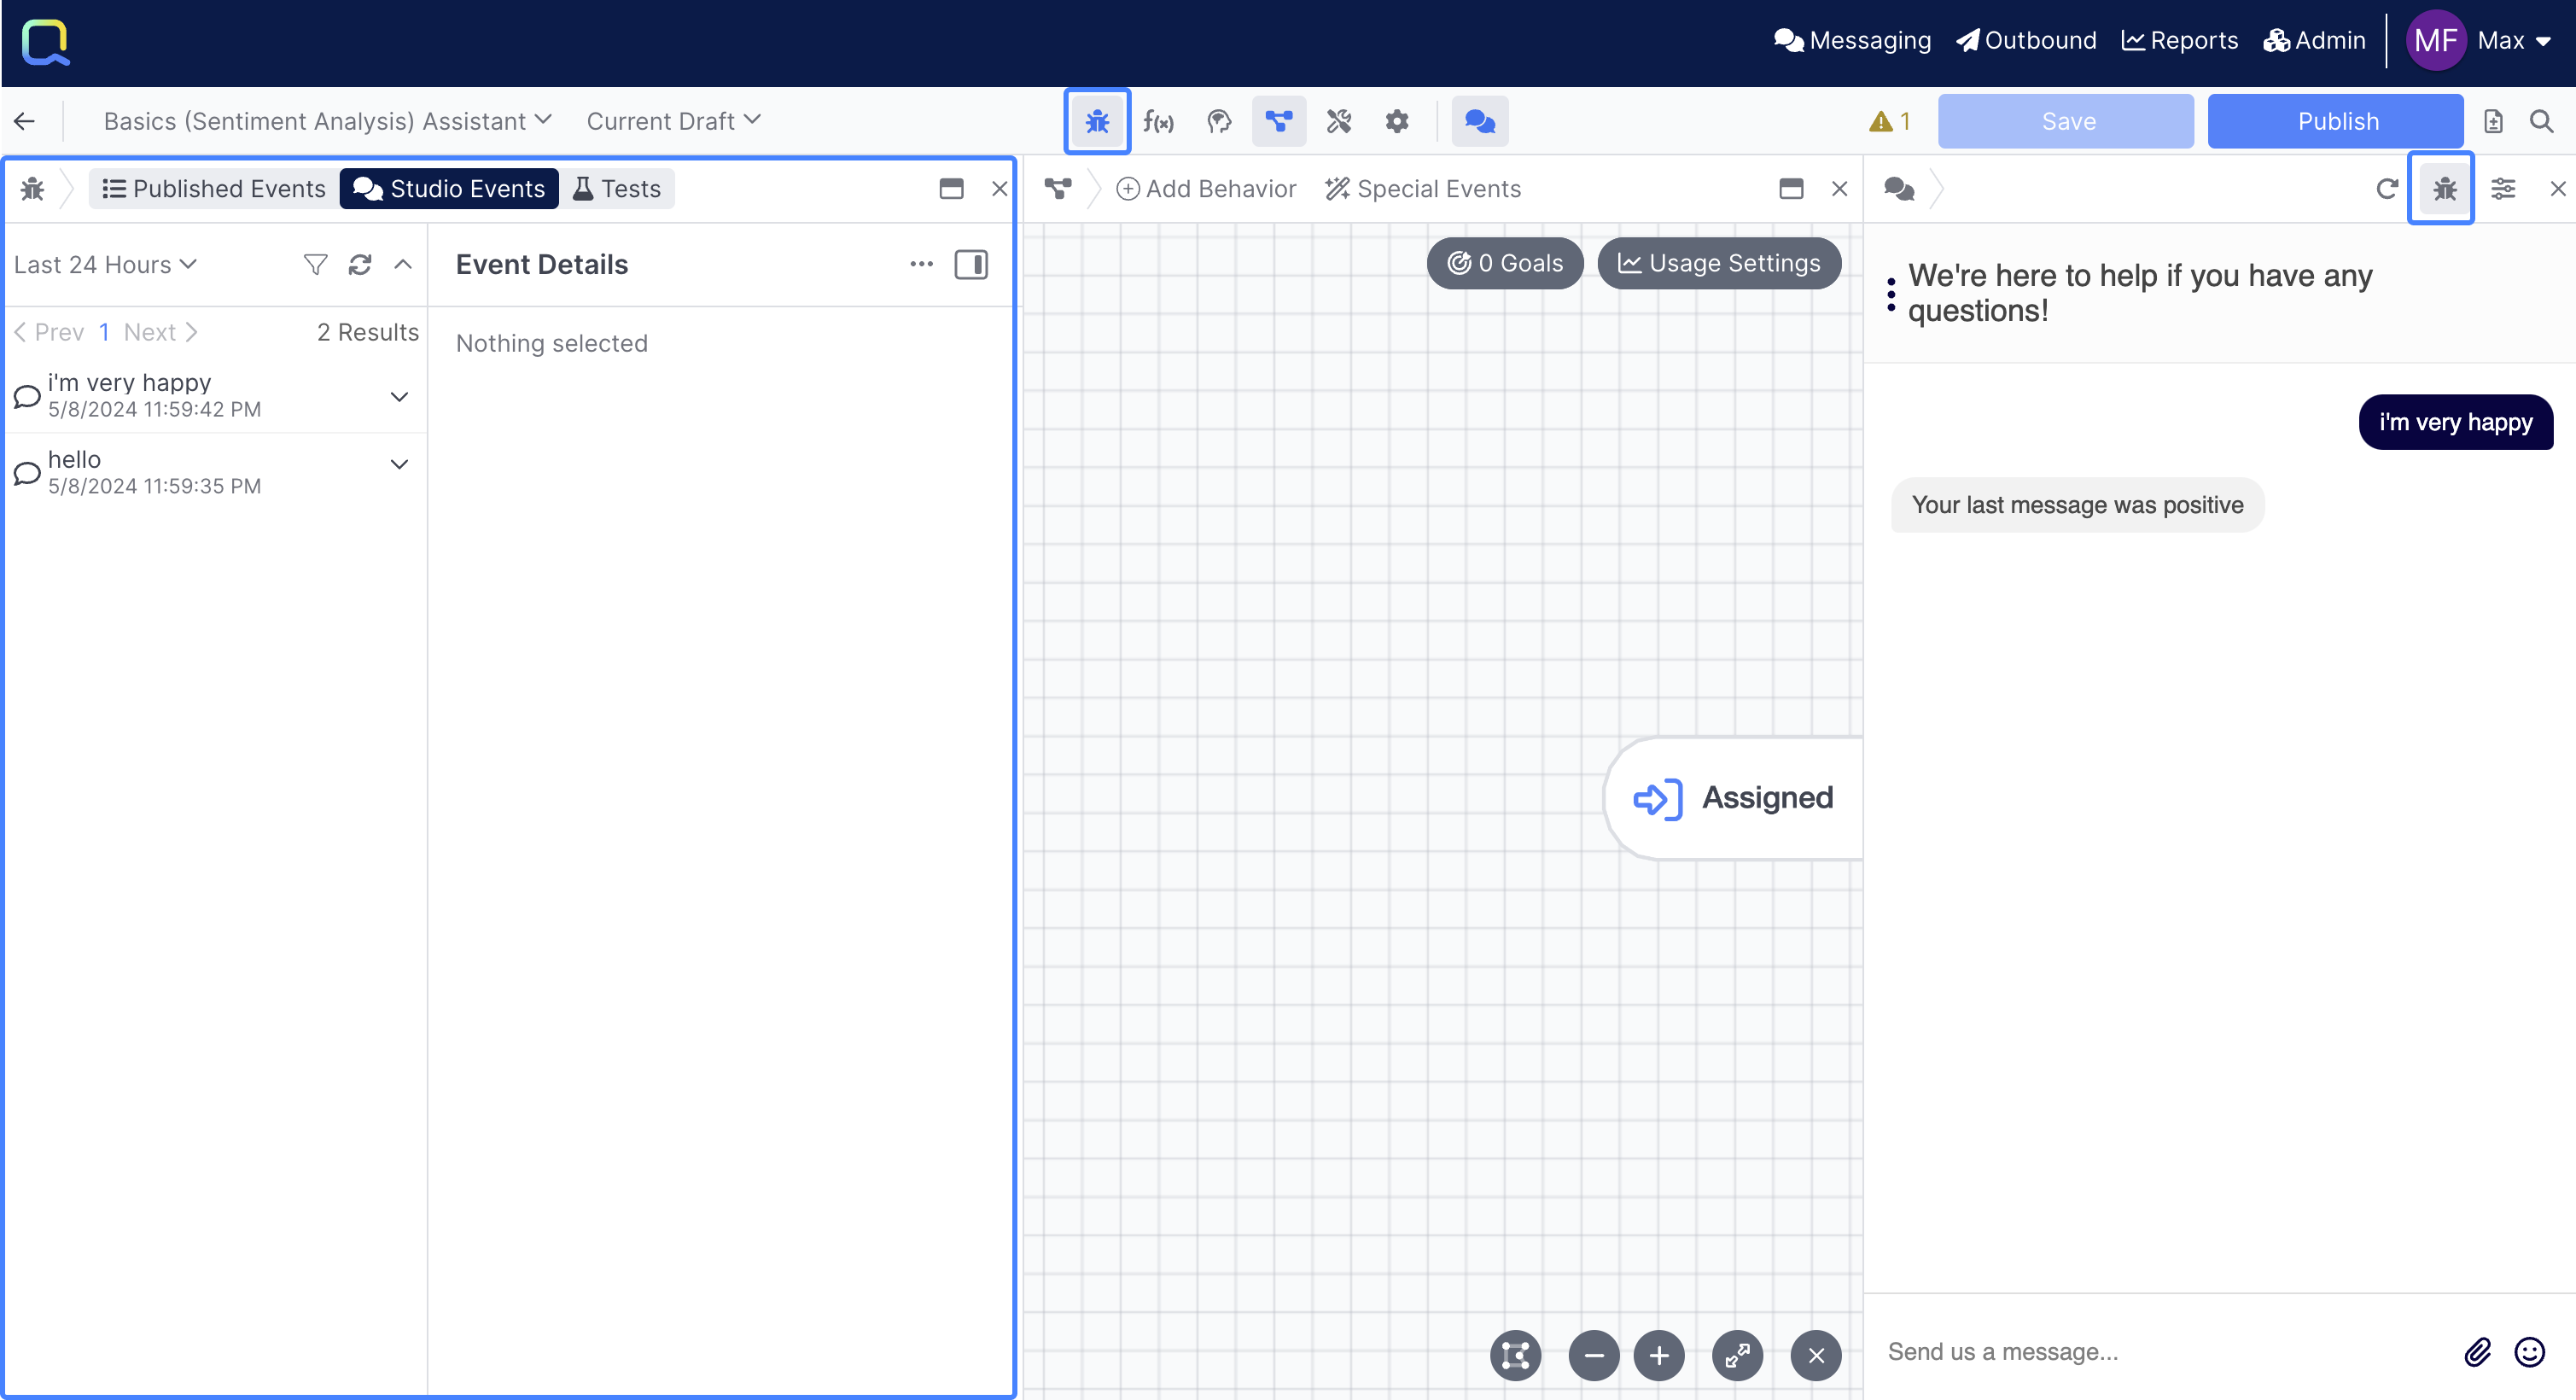
Select the Chat panel to open your assistant and begin a conversation. In the chat panel, type "i'm very happy", and the assistant will respond with "Your last message was positive":
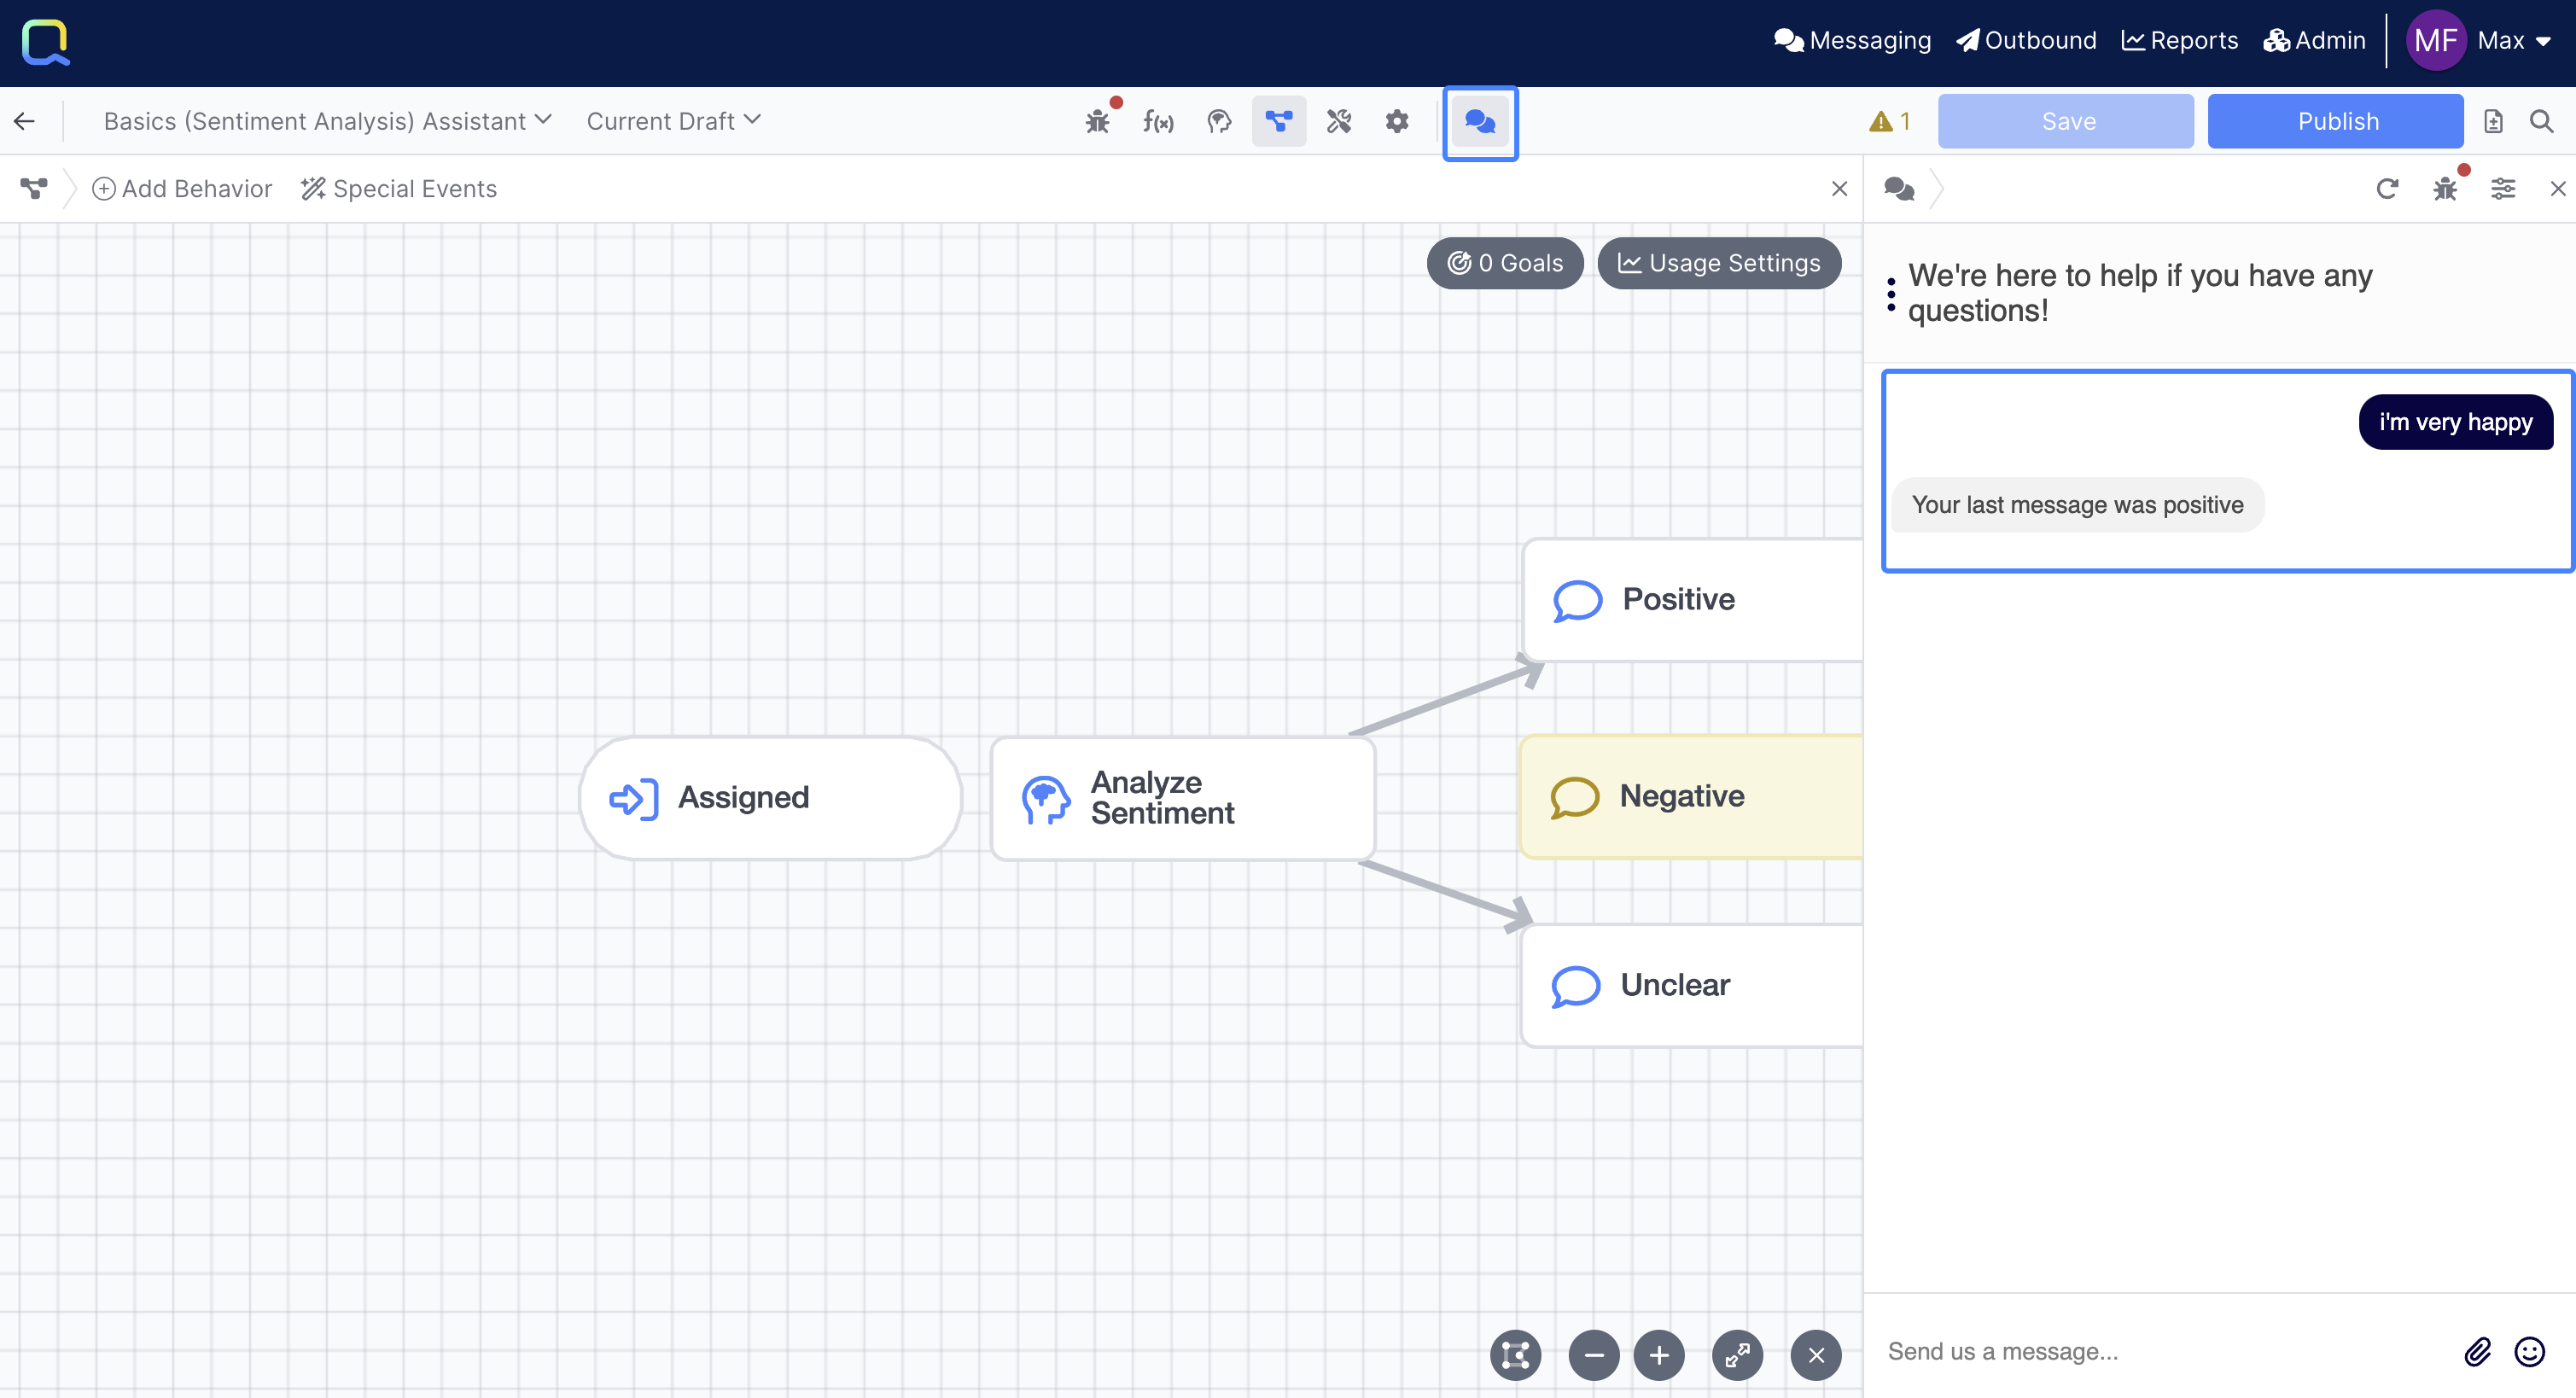
The Chat panel enables you to have a conversation with the most recently saved version of your assistant without having to publish or deploy your experience on your website, or other messaging channels. Learn more
Congratulations 👏 you now know how to have a conversation with your assistant!
Analyzing Conversations with the Debug Workbench
You might be wondering why you're getting a static answer from the assistant, and not a generated one: our assistant is using a Large Language Model (LLM), but not to generate an answer - instead, the LLM is being used to classify and route our conversation.
Using Prompt behaviors to not only generate answers, but also to understand important information about the user's input, like their sentiment, is a core way you can leverage LLMs in AI Studio.
To better understand how this works, click the Debug Workbench icon in the Chat panel header:
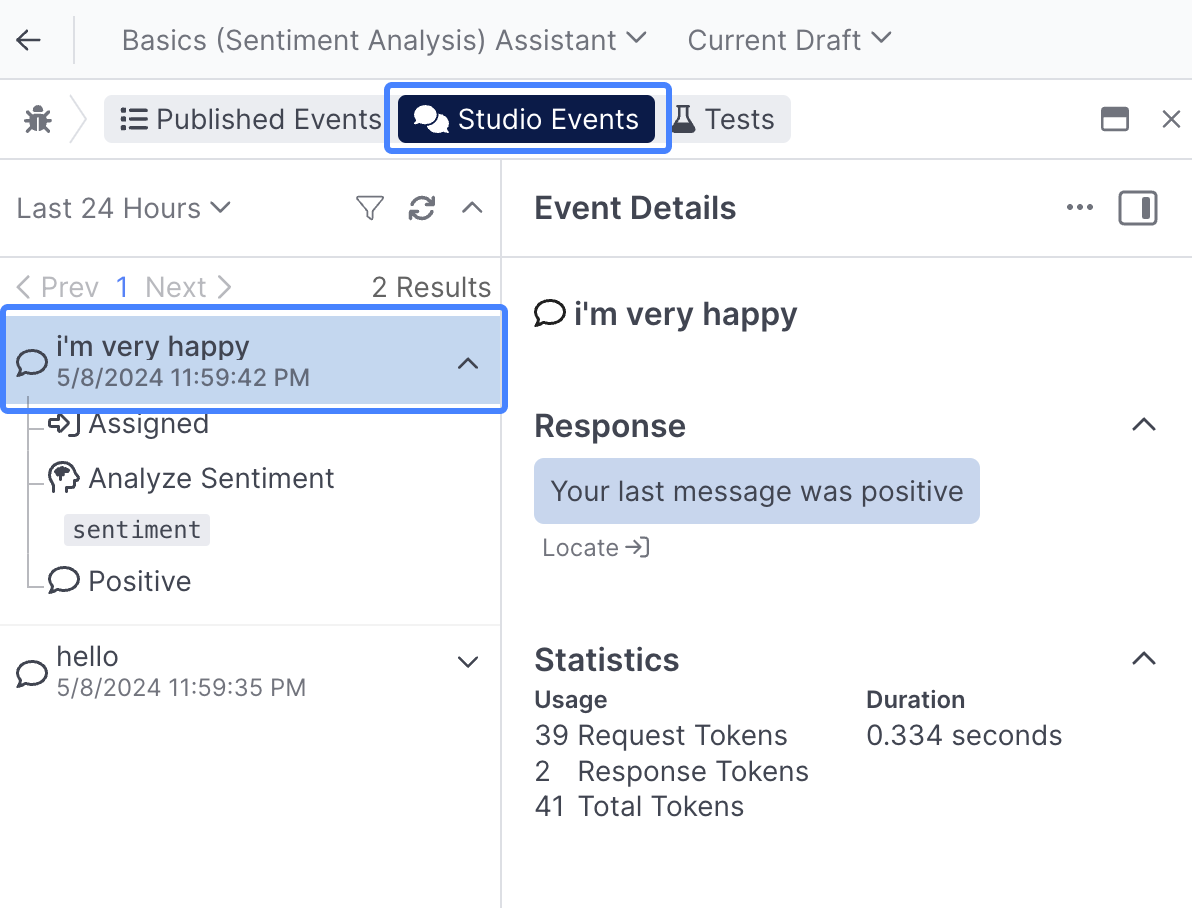
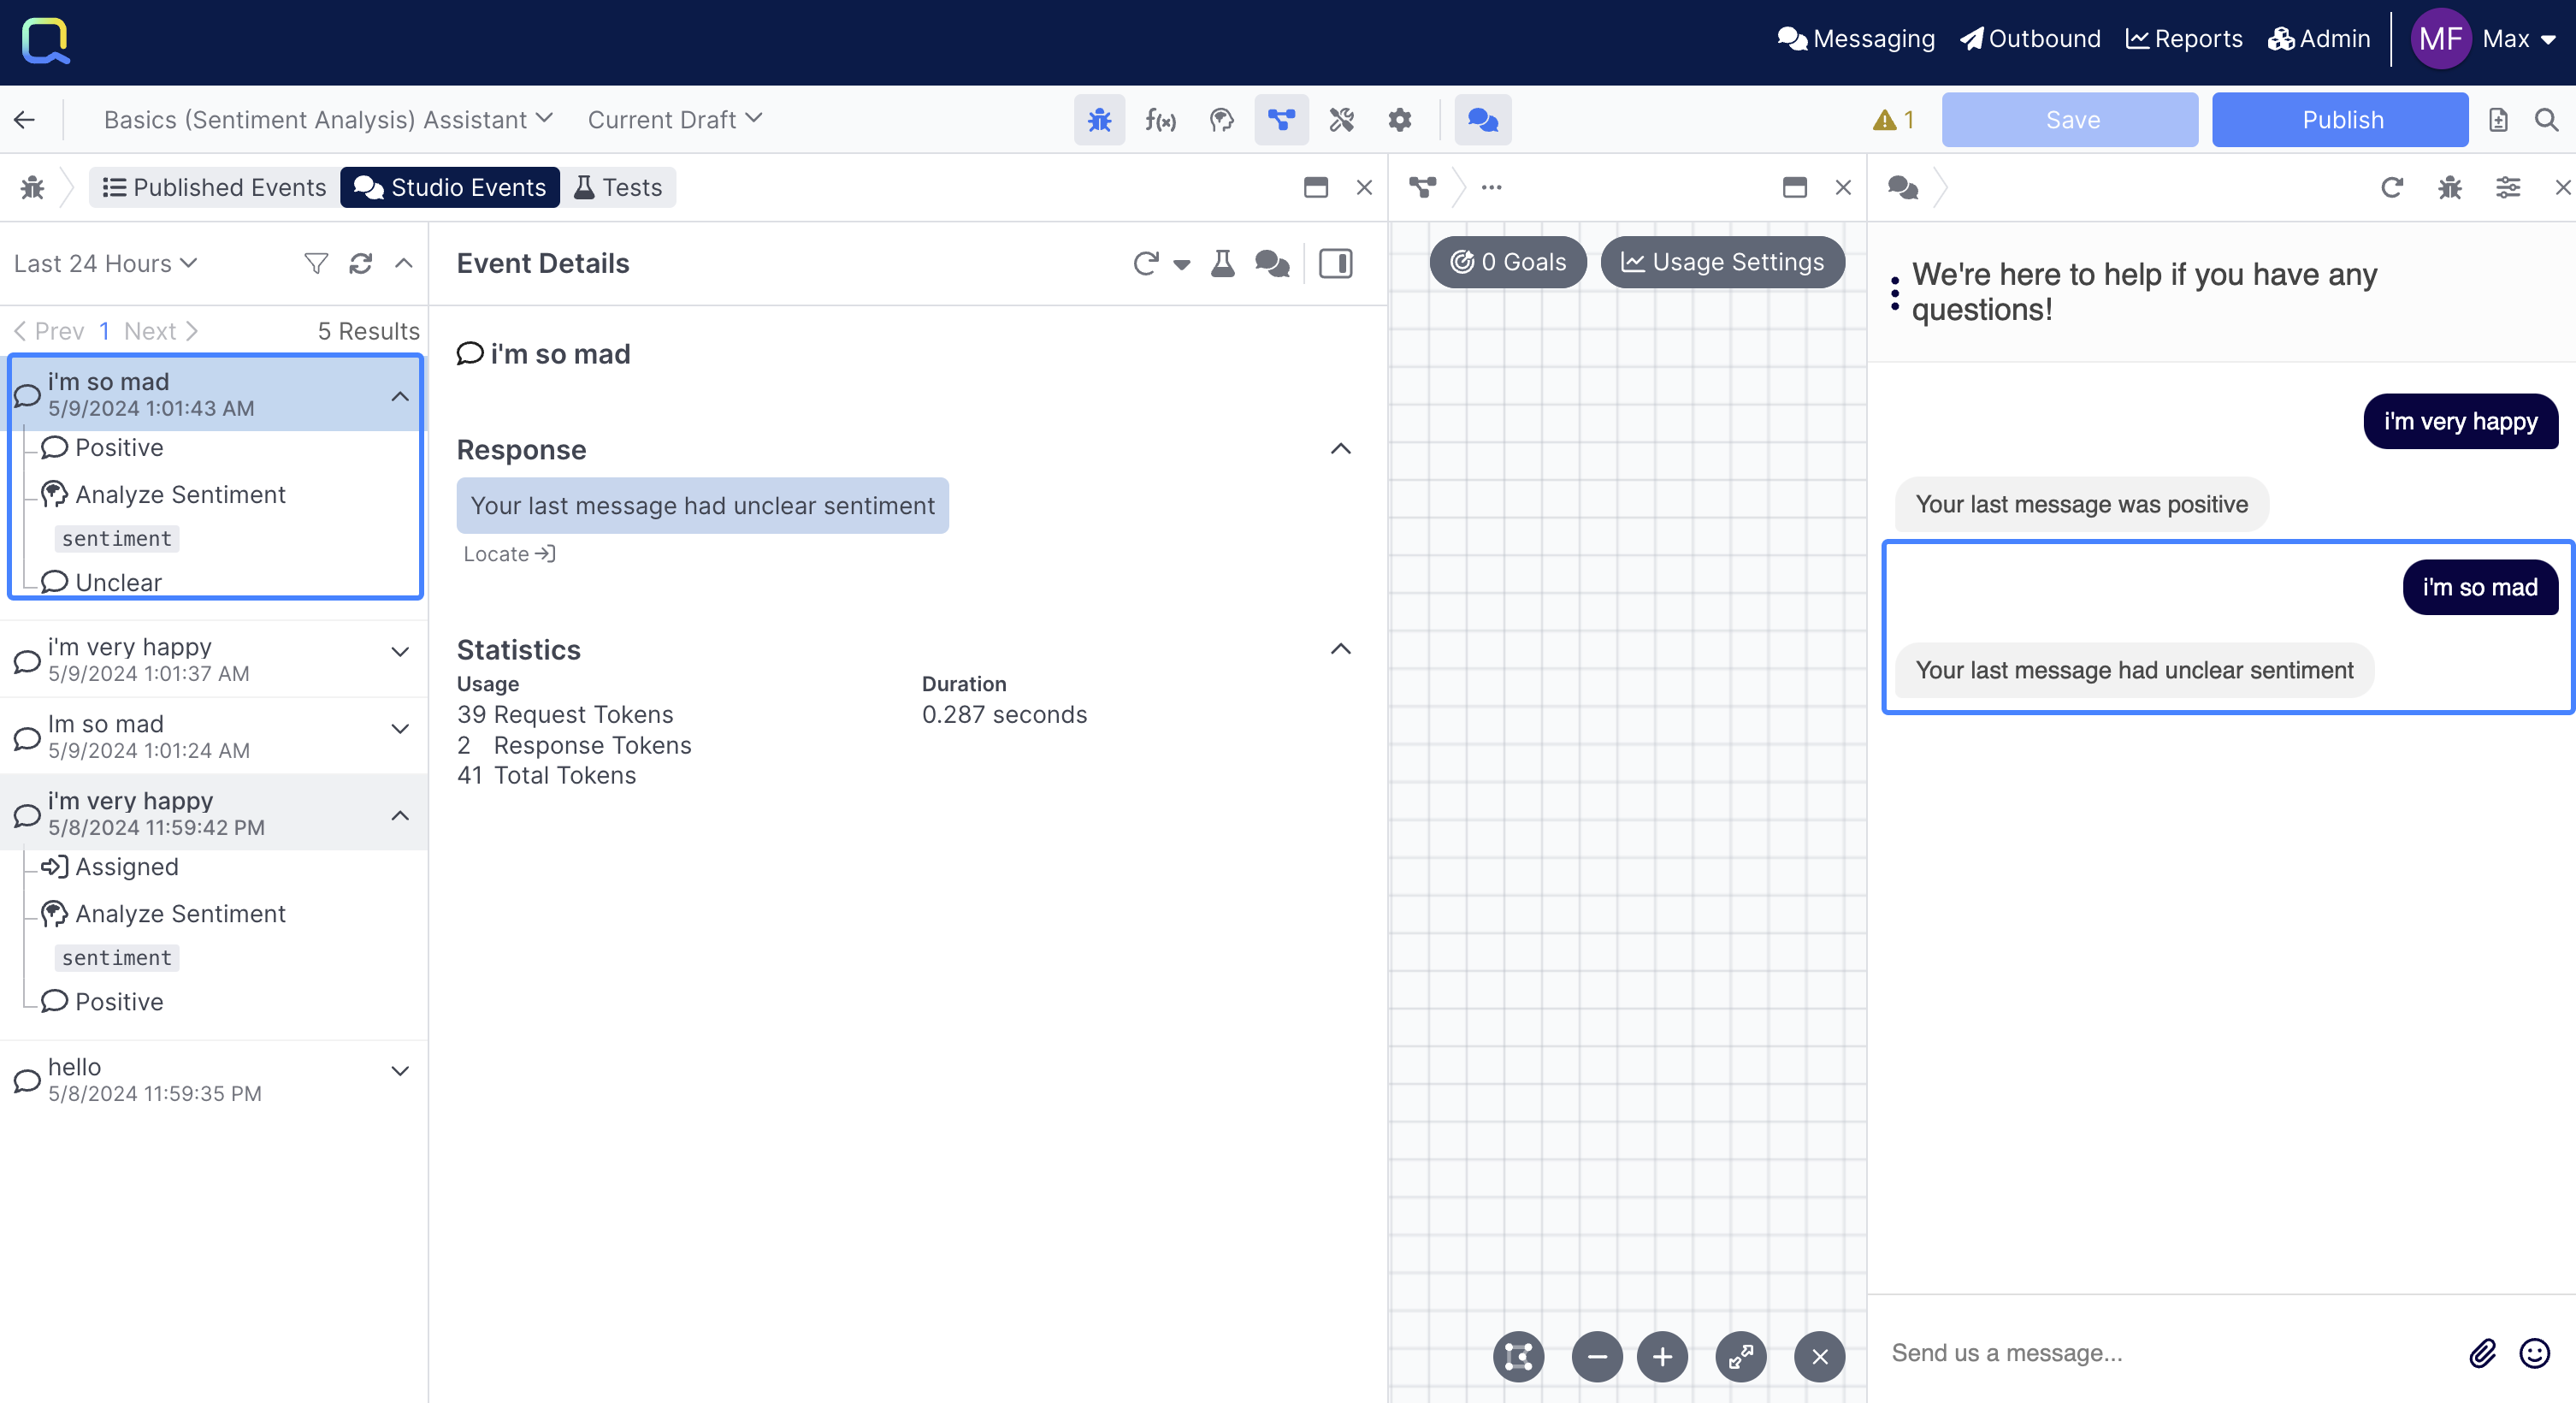
Make sure you're looking at the Studio Events tab, then in the left hand side, click on the "i'm very happy" message you sent in:
The Studio Events tab only shows events that happened within AI Studio, while Published Events shows events from real user conversations.
Below the message, you can see the 3 different behaviors your message went through that ultimately ended with the "Your last message was positive" response:
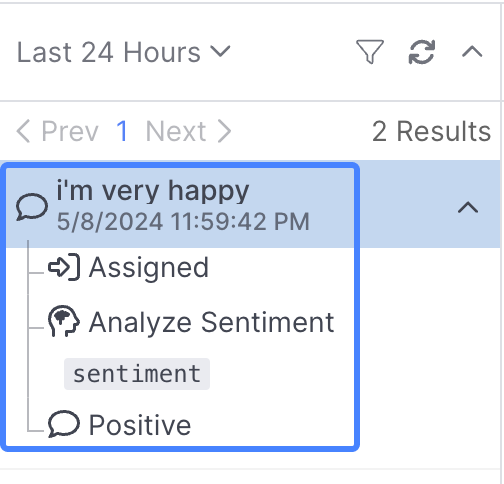
The message first went to the Assigned behavior (which is where all new conversations start), then went to the Analyze Sentiment behavior, then ultimately to the Positive behavior, which sent the message we received in the chat.
You can click on any of the behaviors to view more details - click on the Analyze Sentiment behavior to take a look at how we're leveraging an LLM to create a prompt to classify the user's sentiment:
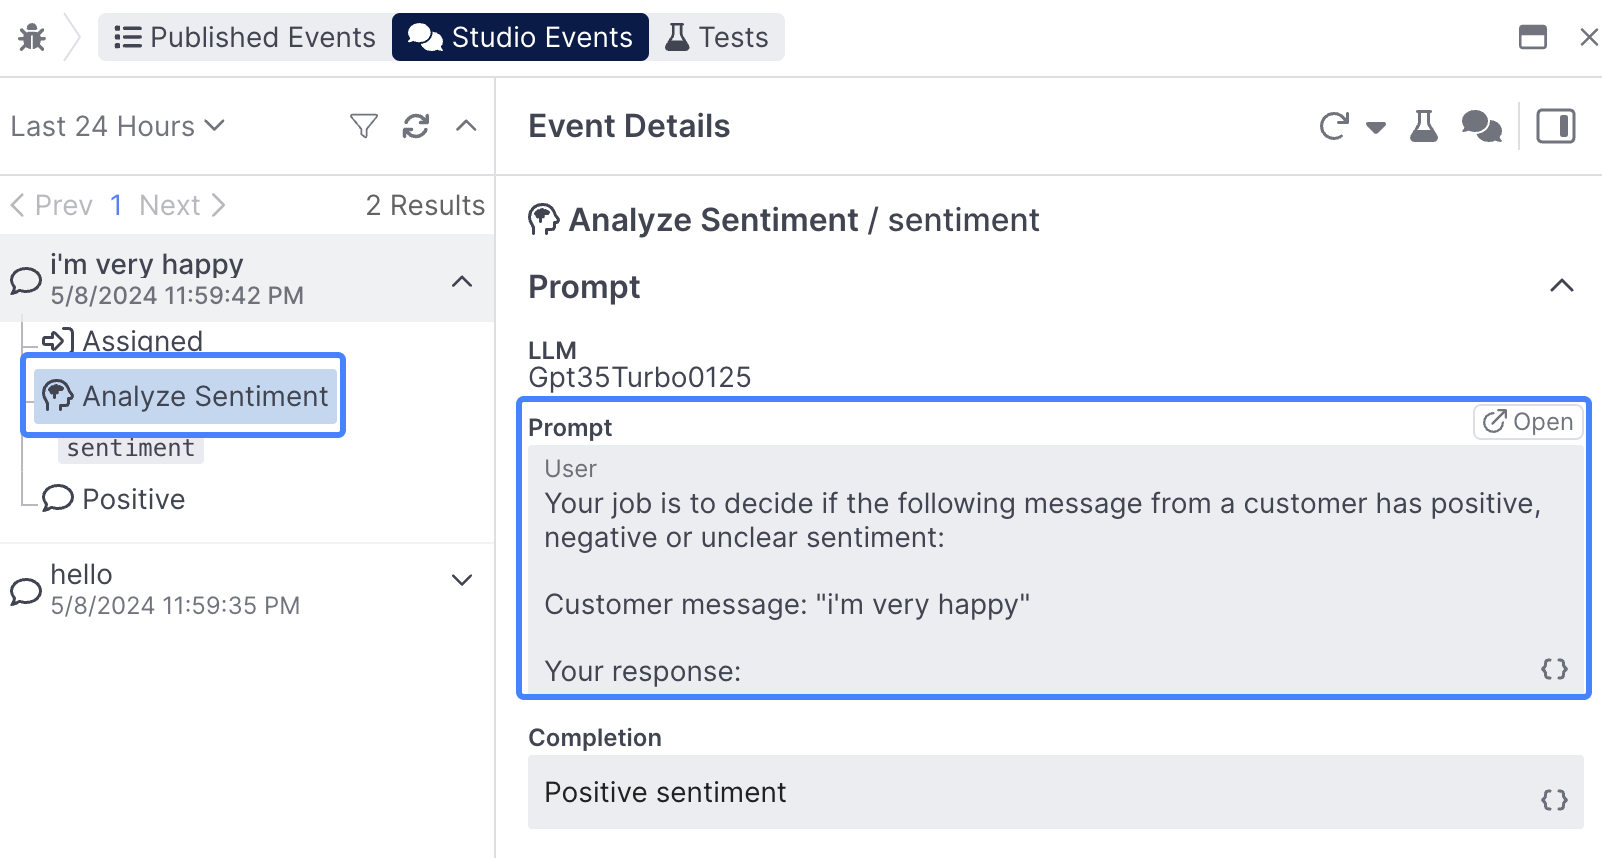
In the Event Details section we can see the prompt used:
Your job is to decide if the following message from a customer has positive, negative or unclear sentiment:
Customer message: "i'm very happy"
Your response:
as well as the Completion (the response to the prompt), which, in this case, correctly identifies our message as having a positive sentiment.
The Prompt Editor panel at the top of AI Studio contains all of the prompts in your assistant, and provides you with the ability to edit them.
You won't be working in the Prompt Editor for this lesson, but you'll learn more about creating and modifying prompts in subsequent lessons.
Congratulations 👏 you now know how to inspect a user turn with your AI Assistant!
Fixing your Assistant
You may have noticed either the yellow Negative behavior in your graph, or the yellow warning icon near the Save button:
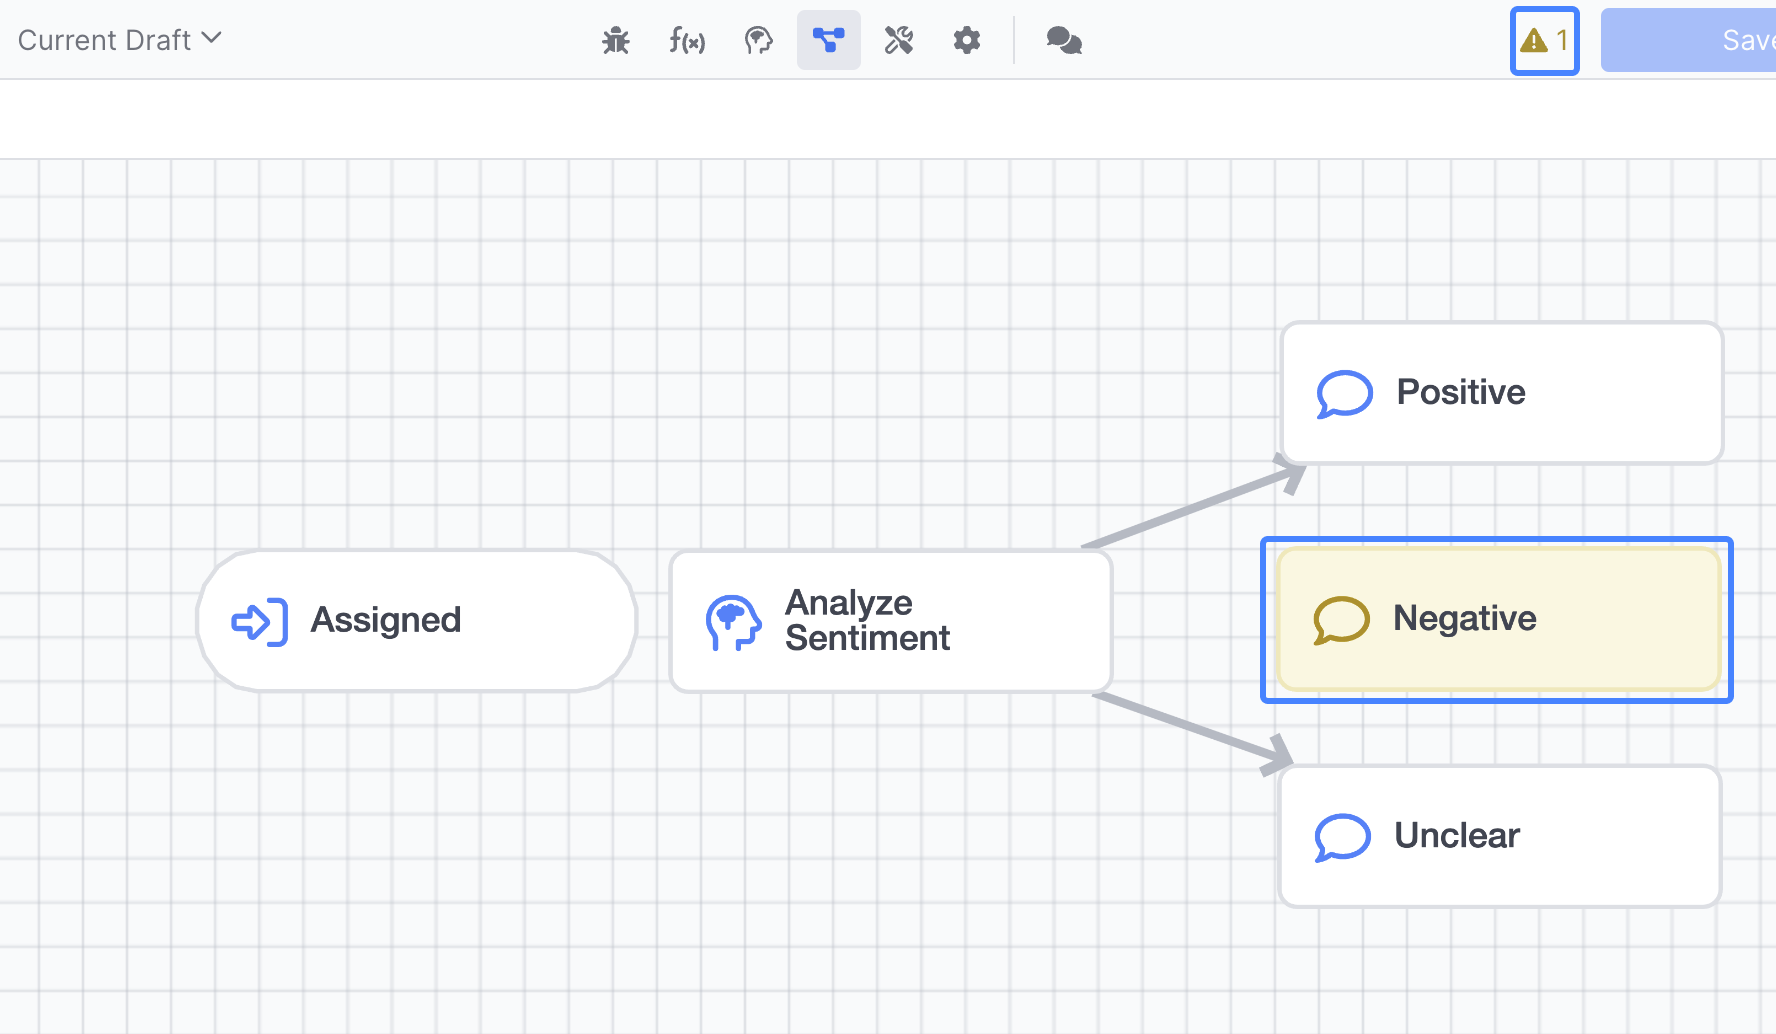
Both of these indicate that the behavior is currently unreachable.
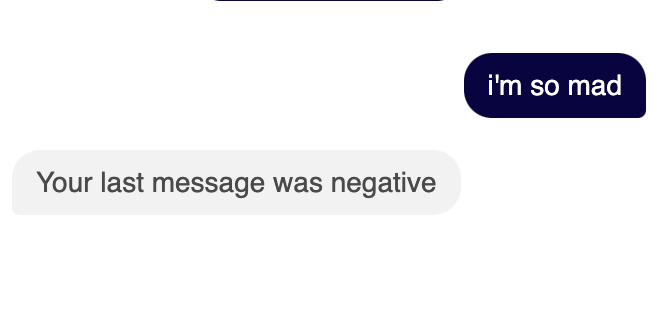
You can confirm this by entering a phrase that should go to the Negative behavior, like "i'm so mad", and seeing that it currently routes to the Unclear behavior:
Select the Analyze Sentiment behavior to double check that the behavior is analyzing the message correctly:
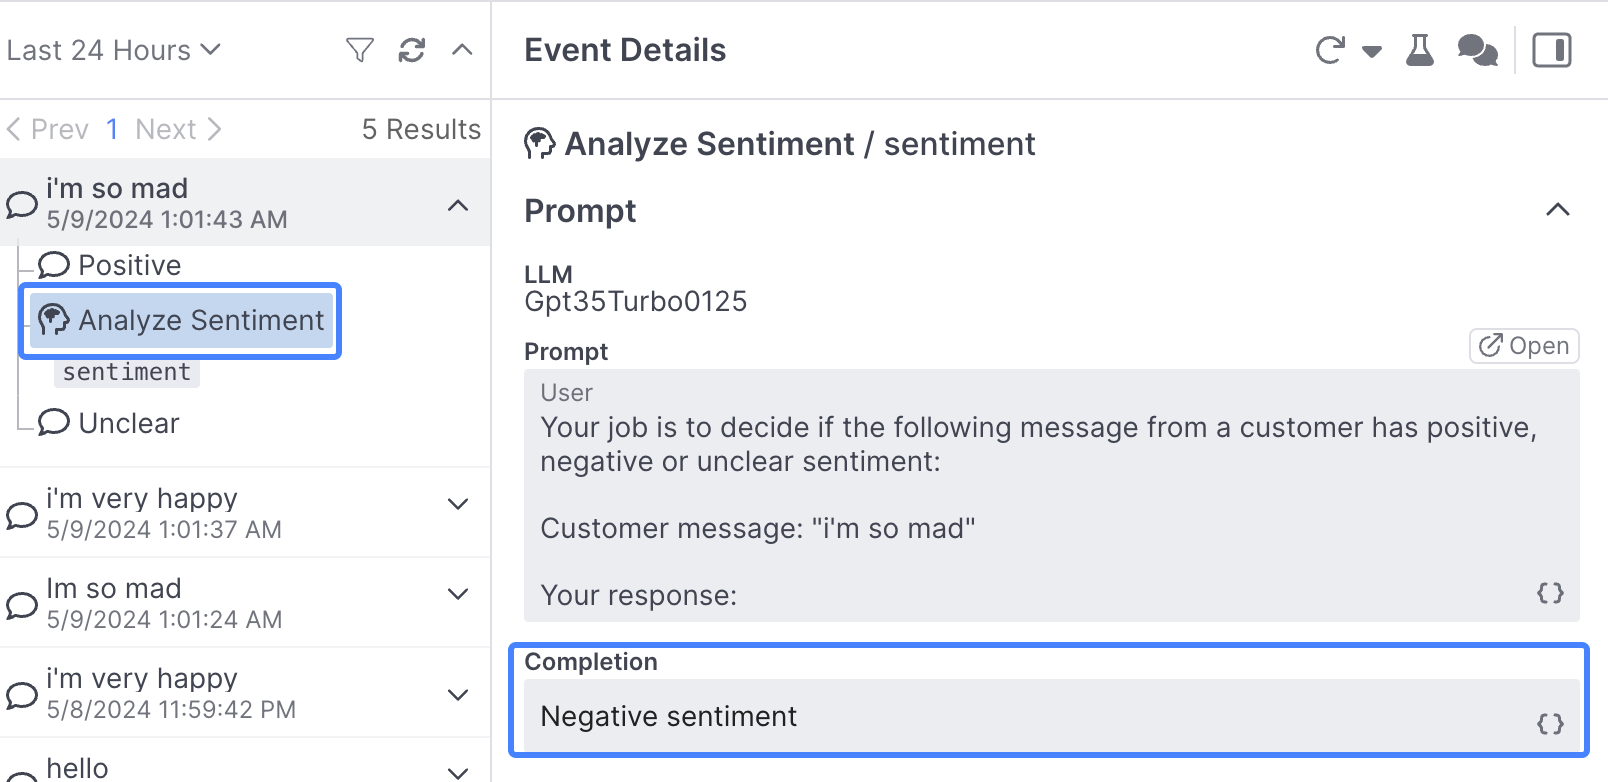
You can see that the Analyze Sentiment behavior is correctly identifying your "i'm so mad" input as a negative sentiment.
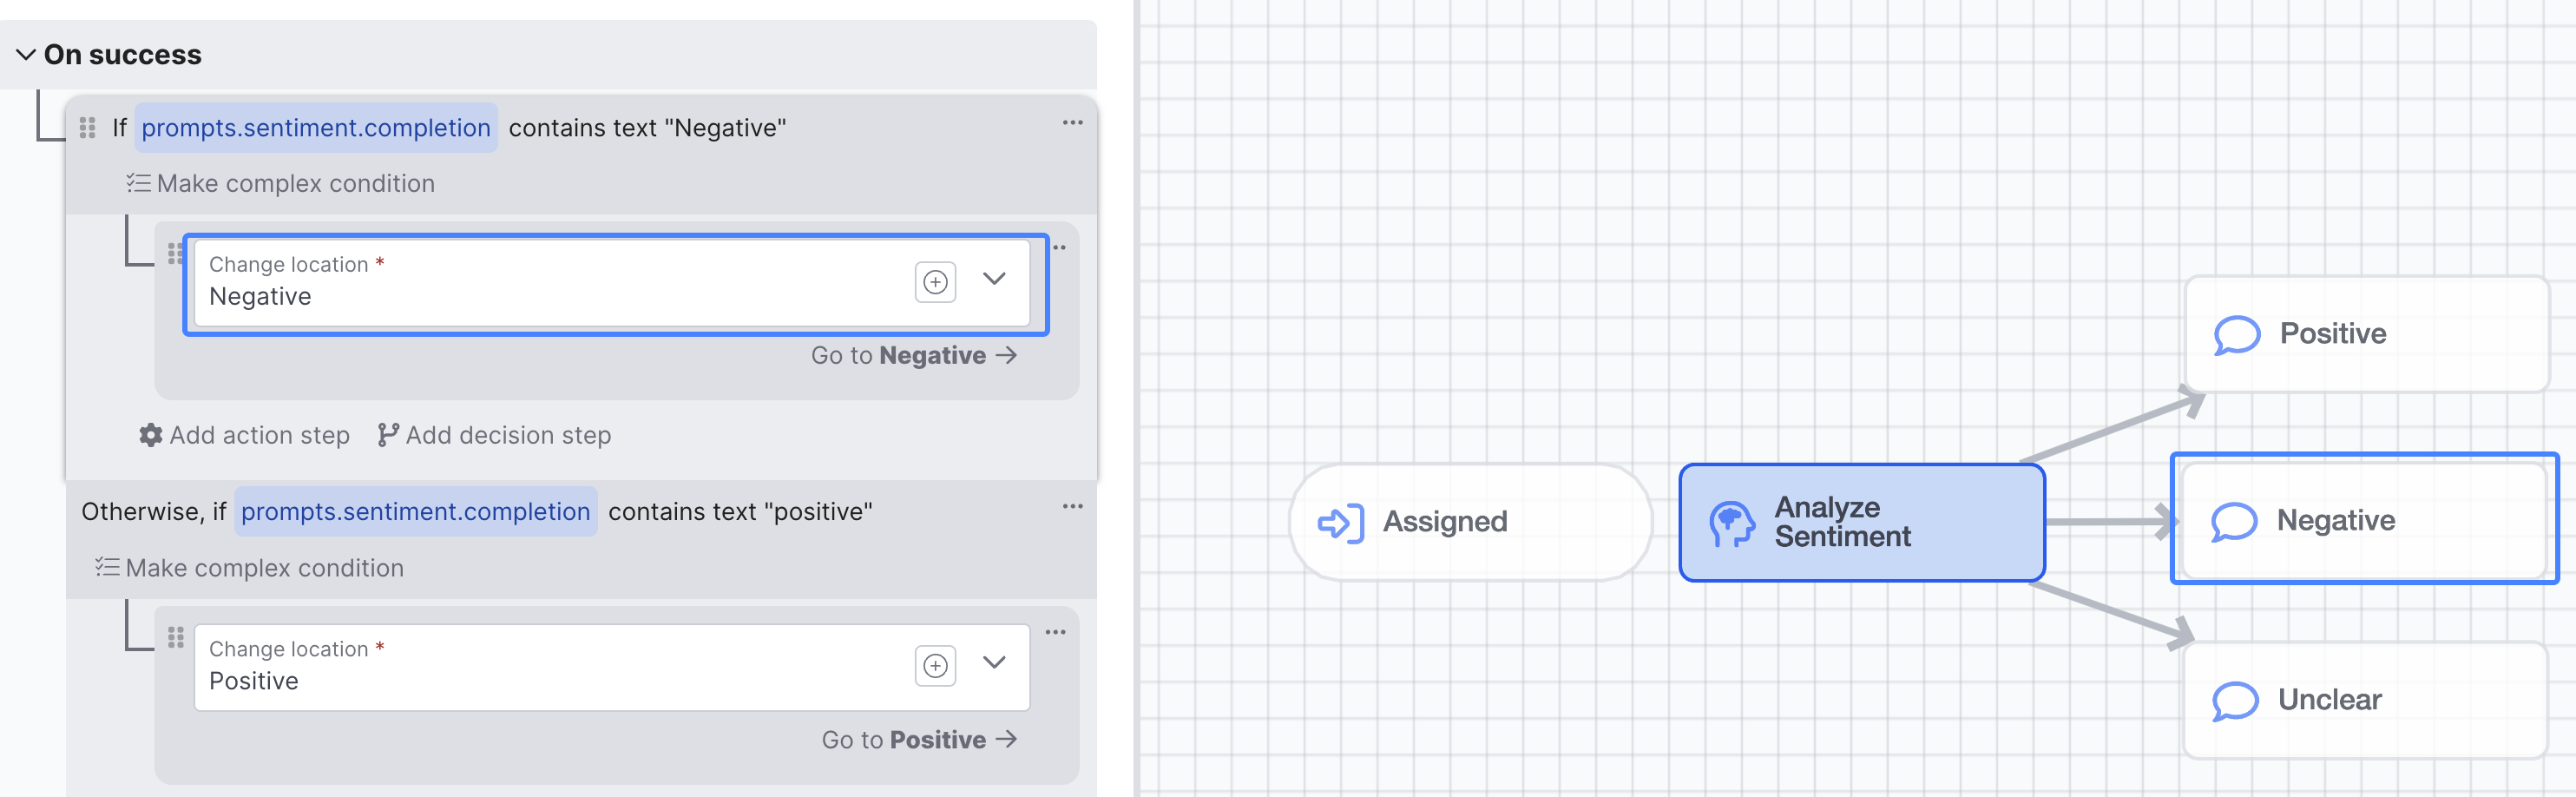
Next, open up the Analyze Sentiment behavior by double-clicking on it, and scroll to the On success section:
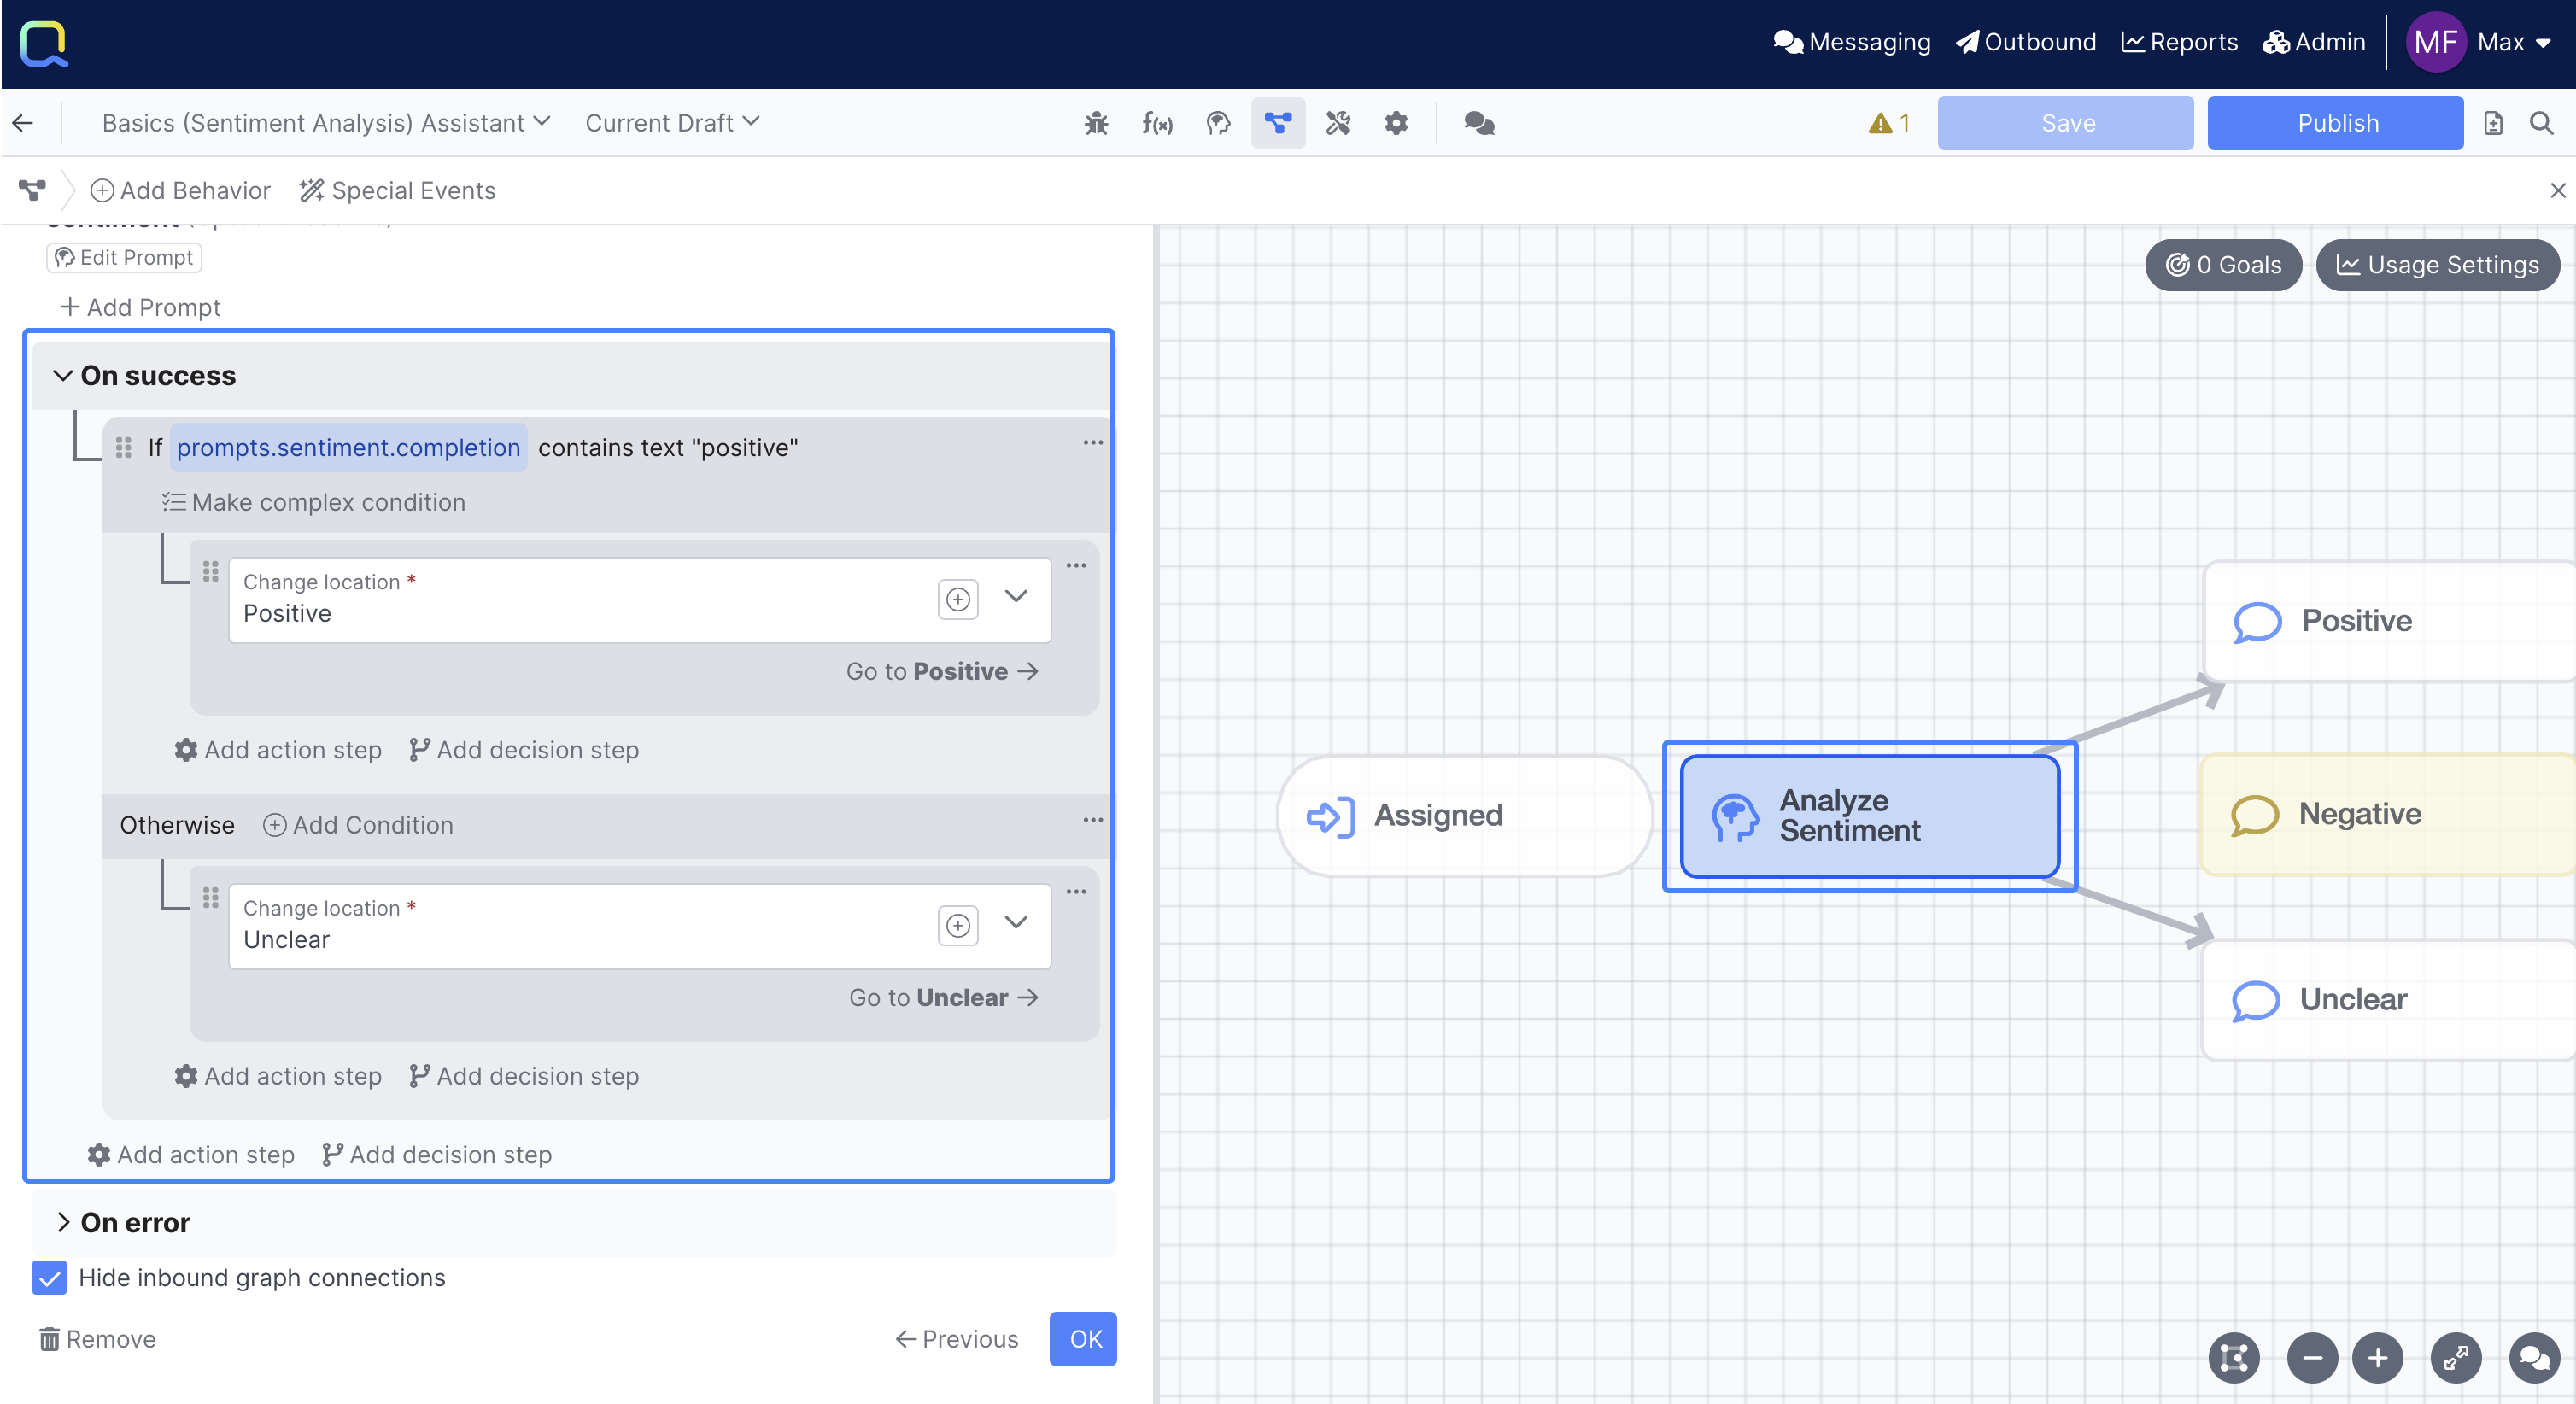
You can see there are two condition steps set up:
One that goes to the Positive behavior location if the sentiment is positive, and a fallback that goes to the Unclear behavior if that first statement isn't true.
You'll need to add another condition that checks for the Negative completion, and routes to the Negative behavior. To do that, use the Show options menu on the first condition and select Add condition above:
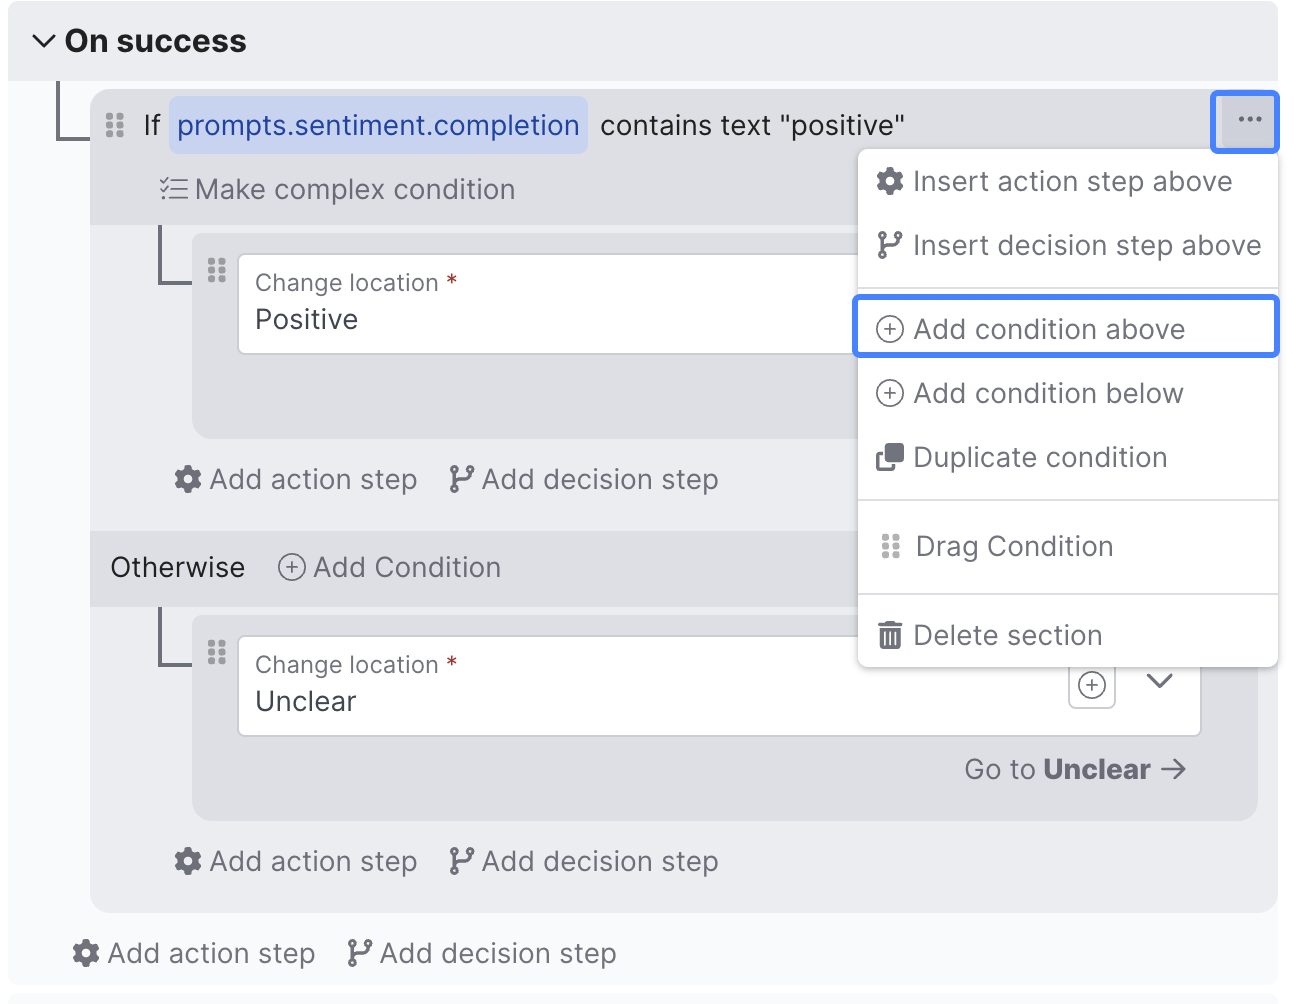
Order matters for conditions, which is why an Otherwise condition will always be required as the last option in case none of the prior conditions are true.
In this case, you could add the negative sentiment condition above or below the positive condition and it would work in both places.
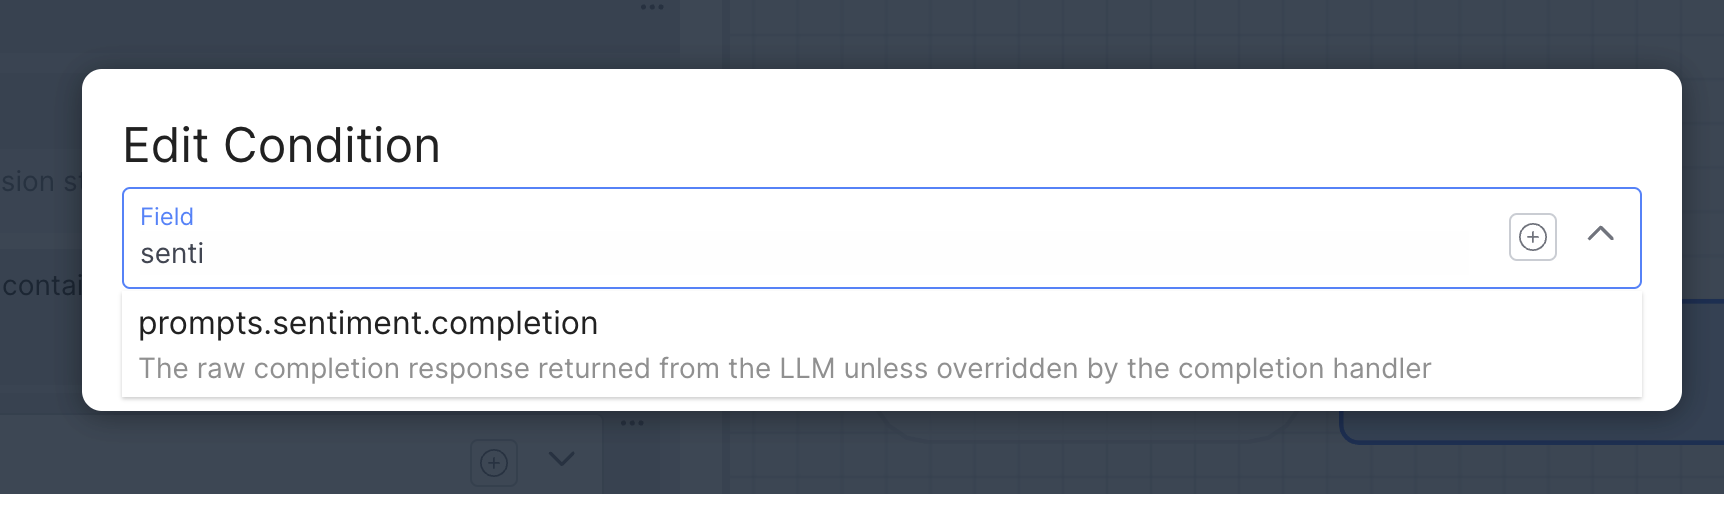
Next, search for sentiment and select prompts.sentiment.completion, which is the answer the LLM gives back in the sentiment prompt:
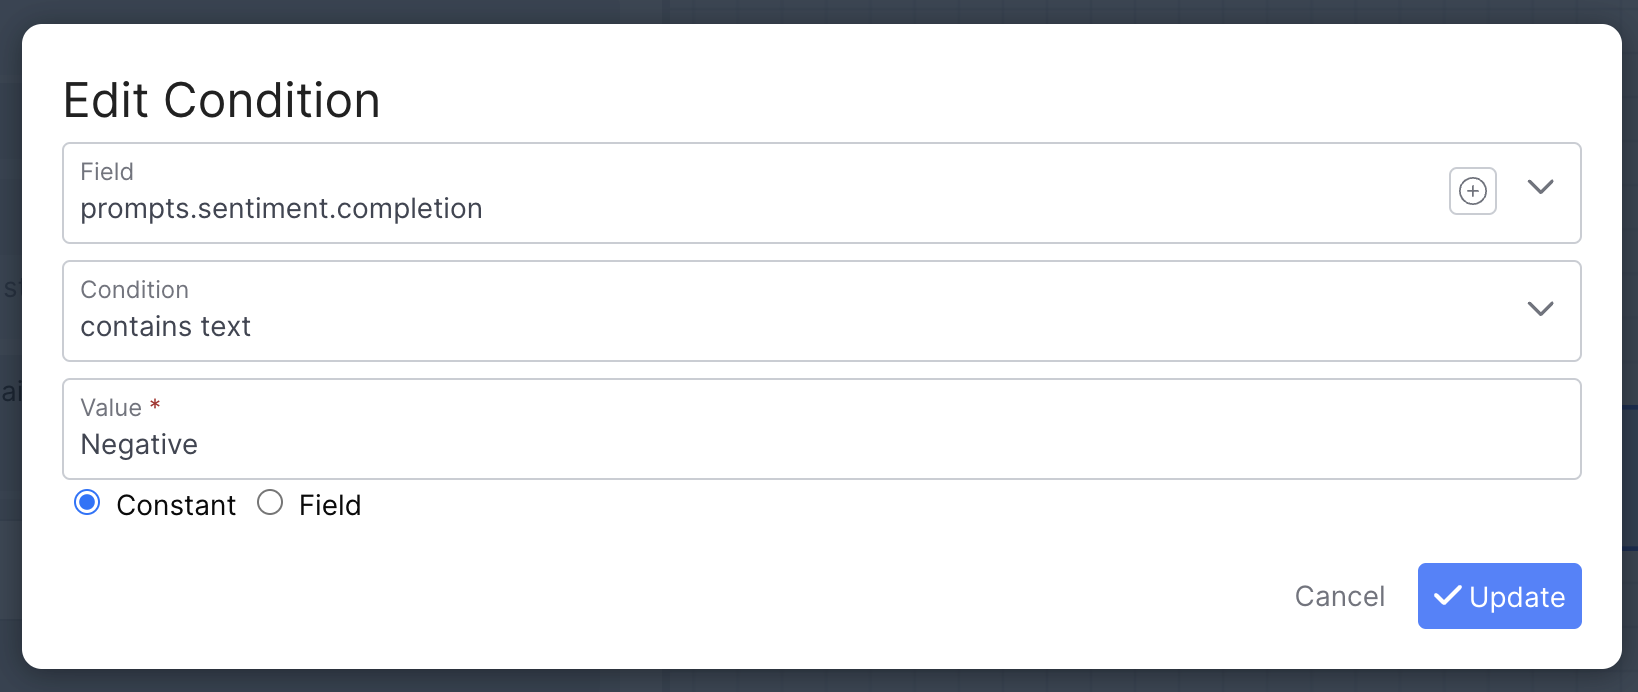
Then update the Condition to contains text and the Value to Negative and click Update:
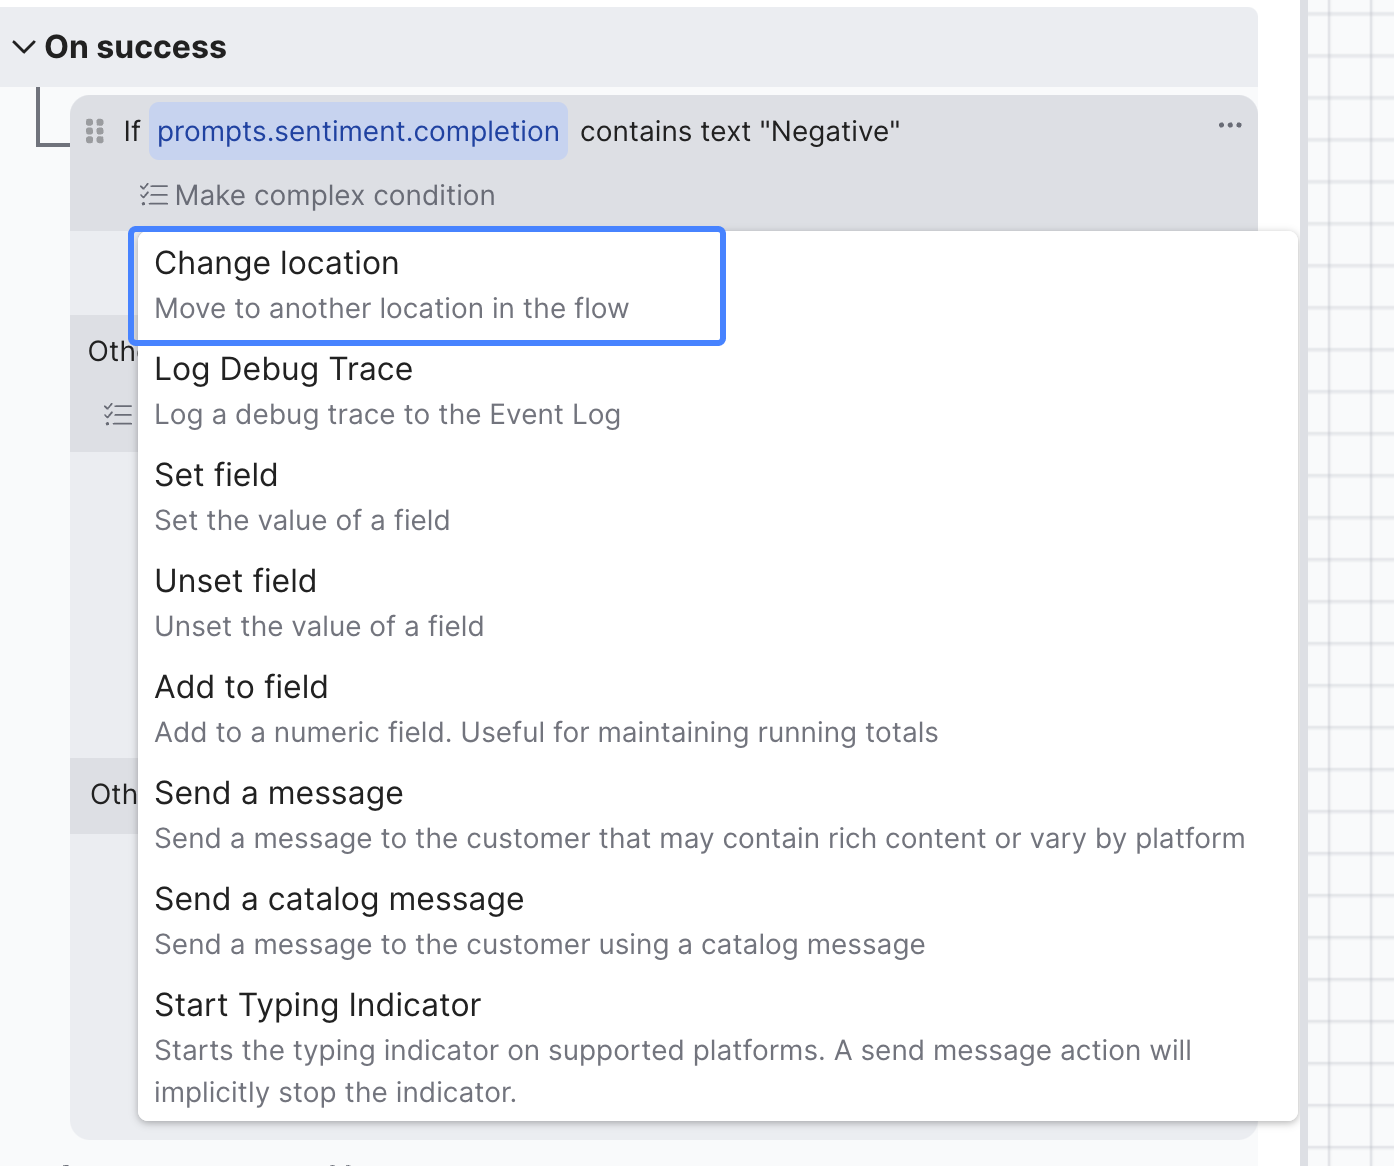
You've now successfully added your condition. Next select the Add action step button to make sure a negative sentiment goes to the Negative behavior:

There are lots of actions you can take when your condition is matched, in this case select Change location, which enables you to move to another behavior:
Next, you'll need to select the Negative behavior from the dropdown. At this point you'll notice the Negative behavior is no longer yellow, and there's a link connecting it to the Analyze Sentiment behavior:
Congratulations 👏 you now know how to use an LLM completion to conditionally go to a behavior!
Testing your Assistant and Publishing
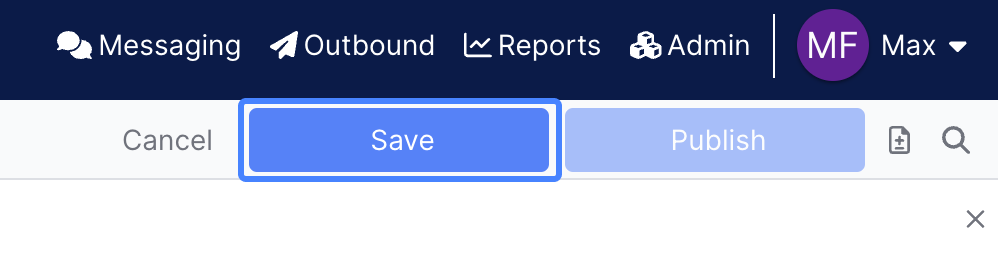
After all that work, it's time to test your assistant again and publish your update. First use the Save button in the top right of the assistant:
Now try sending in the same "i'm so mad" message as before, and you'll see it now correctly goes to the Negative behavior:
In order to test new changes in the Chat panel, your changes must be saved, but they do not have to be published.
Next, use the Publish button to set your changes to be live!
You can easily roll back to any previously published version of your assistant, you can read more here
Congratulations 👏 you now know how to save, review, and publish your changes!
Key Concepts
Panels
- AI Studio is comprised of several panels, that can be opened in whatever combination you see fit, all of which play an important role in building and deploying great conversational experiences. Learn more
Chat
- Use the Chat panel to have a conversation with your assistant without needing to publish or deploy your experience on your website or any messaging channels. Learn more
Using LLMs to make Decisions
- You can use the completions of your LLM from a given prompt to help decide where the user should go next.
Saving, Publishing & Reviewing
- In order to test changes to your assistant using the Chat panel, you'll need to save first.
- When you're ready to publish your changes and set them to be live, you can use the Review tool to see exactly what's changed since your last publish. Learn more
What's Next
You should be getting familiar with how AI Studio is laid out, and what the core building blocks are. In Lesson 2 you'll learn more about how to work with the Prompt behavior, and how you can chain multiple prompts together, run them in parallel, and create tests.
Updated 8 months ago